Pages on this Blog

Friday, August 29, 2014

IFTTT FOR ATTORNEYS: CREATE A PHONE LOG

IFTTT is a mobile app that will automatically do something in one app if something else happens in another app. For example, when this post gets published, IFTTT will automatically create a tweet in twitter with the post title and a link for me. All without me ever actually opening Twitter.

IFTTT isn't limited to Twitter and Blogger. In fact, there are dozens of services that IFTTT can cause to work together. I tend to think of IFTTT as a scaled down, but free and easier to learn version of Tasker. I use them both, each for different tasks.

IFTTT is useful in general, but I think there are some recipes that can be of particular use to attorneys. As I come across them, I'll write about them here. 

Today's tip is how to use IFTTT to keep track of your cell phone calls by creating and keeping an automatic call log in Google Drive. This may be of more use to solo and small firm practitioners particularly, but anyone that uses a cell phone for client communications can benefit.

In IFTTT, you will need to make sure that you enable the Google Drive and Android Phone channels. Next, create a new recipe and click on the "if" statement.


Next, choose "Android Phone Call" from the list along the top. Within that, click on the plus sign next to "Any phone call placed".


Then, click on the plus for the "Then" statement.


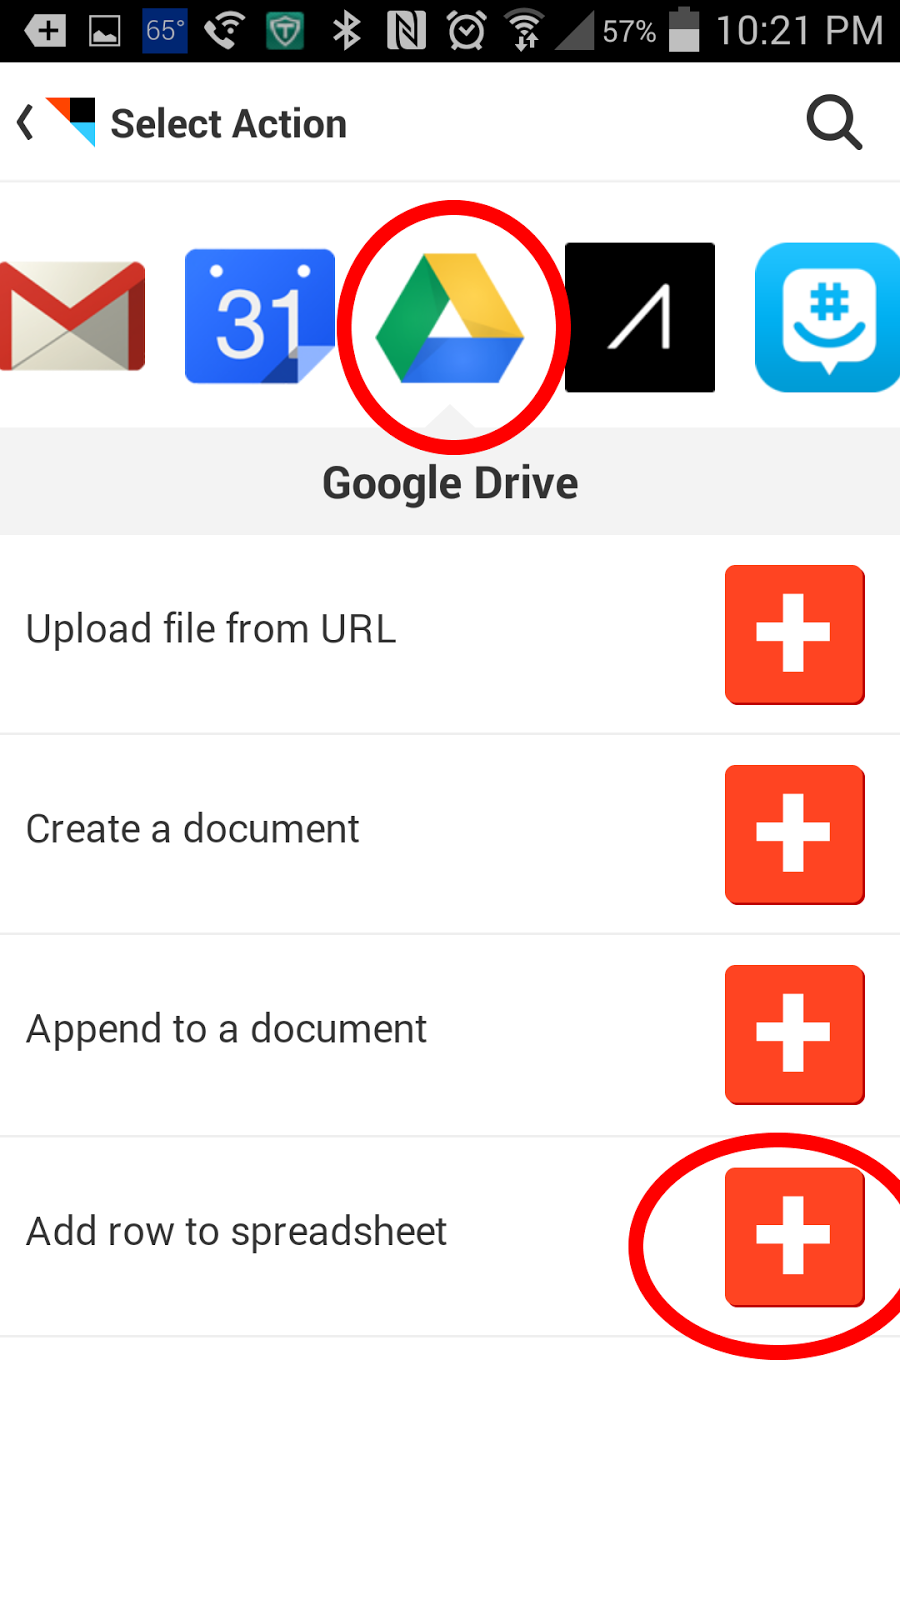
Then, scroll and find Google Drive. Click on it, and then click on "Add row to speadsheet".


What this will do is create a new spreadsheet named "Phone call" in your Google Drive account in a folder called IFTTT. It will have four columns that state when the phone call was made, what number was called, who was called, and how long it lasted. You can tweak some of this in the edit recipe menu.


How is this useful for an attorney? If you make several phone calls on the road, you can quickly enter your time into your billing or case management software by referencing a single spreadsheet. The only thing you would have to do is remember what the substance of the call was. This is much easier than going through your phone's call log an into each entry to see when the call occurred and how long it lasted for billing purposes.

Wednesday, August 27, 2014

NEED AN ULTRA LIGHT BROWSER? TRY MIDORI

Previously, I mentioned that I had a 10 year old laptop that shipped with Windows XP but had no hope of running Windows 7 or 8. So, instead of sending it out to pasture, I installed Linux.

It runs Linux without any problem, but its relatively small amount of RAM struggles with browsers like Chrome (it's actually Chromium) and Firefox. These browsers are great and offer a lot a really useful features. But, they are memory intensive for an older laptop like my Linux box.

So I began searching for a stripped down browser that would let me navigate the web but without all of the bells and whistles. Midori is a true unitasker as opposed to the Chromes and Firefoxes, which want you to stay in them to do everything.

Don't get me wrong. There isn't anything wrong with Chrome or Firefox wanting to do everything for me. I still use them on my newer machines. They just aren't as helpful on older machines.

So, if you find your internet experience to be too sluggish or you just want a browser that is a browser and nothing more, give Midori a try.

To get Midori for windows, go to their website and click download.

If you're running Debian Linux, from the terminal, just type: sudo apt-get install midori

Tuesday, August 26, 2014

SMARTWATCHES - ONLY BUY IF YOU WANT A SECOND SCREEN AND NOT A SECOND PHONE

Having spent several weeks with the Samsung Gear Live Smartwatch, I have been asked several times now about it. The first question is, predictably, along the lines of "is that one of those smart watches?" The second is usually, "do you like it?" After some back and forth about why I like it, the big one comes: "Should I get one?"

Early on I would deflect and tell people that I hadn't had it long enough to really come up with an answer. Lately, I've been answering directly. And to most people, the answer I give is an unqualified no.
This isn't because I don't think it is a great product. Instead, I think a smartwatch, at least right now, is not what most of the people asking me for my advice really want. A lot of people asking me about it want the watch to be another smaller version of their phone. But it is definitely not that.

Yes, I send and respond to text messages, keep tabs on my email, follow recipes, manage Google Keep, and a whole host of things from my watch. I've even tried using a web browser from my watch. Yet, whenever I need to do something more detailed like replying to a text message with more than one line, I break out the phone.

I think the Samsung Gear Live is a fantastic product and would highly recommend it to anyone that understands what it is - a second screen, not a second phone. If you're picturing having a miniature phone on your wrist, then I would shy away from smartwatches for now at least.

Monday, August 25, 2014

BRING NEW LIFE TO GALAXY TAB 10.1 -- ROOT IT AND GIVE IT A CUSTOM ROM

Over the last month, I brought out my older Galaxy Tab 10.1 (wifi only). It is a decent enough tablet, one of the earlier Android models. When I got it, it was running Honeycomb.

To be perfectly honest, however, it was always a bit sluggish and lagged quite a bit. I had hoped that the upgrade from Honeycomb to Ice Cream Sandwich would help, but it didn't, not really. Then, I watched Jelly Bean come out, but it never came to my tablet.

I kept using it, but it was never turning into what I had hoped: a tool to help organize notes, review information on the run, and keep track of my cases. Yes, it could do it, but it was sluggish and the writing apps weren't all that great.

Then, I watched OneNote come out with its handwriting addition to its Android app. I was excited for what it could do to my tablet. When I went to the Play Store, it was not available for my tablet, which was running Android version 4.0.4.

Almost ready to give up on my tablet, I came up with a new plan. I rooted my tablet and installed CyanogenMod 10.1. All of which was absolutely free and not terribly difficult to do.

Now, I'm running Android 4.2.2, and maybe it's just wishful thinking, but I think the whole tablet feels a little bit quicker. Plus, I can use OneNote again.

So, if you've got older technology (yes, I know, a 3 year old tablet isn't that old in the grand scheme of the cosmos, but it is in terms of early tables), before giving up on them, there might be ways of scraping a little more life out of them.

IS A TYPEWRITER REALLY OBSOLETE IN A LAW OFFICE?

I recently read this article over at the Lawyerist discussing a number of obsolete technologies that should be out of the modern law firm. Some of them I completely agree with: Windows XP, dictaphones, and the fax machine should all be done with entirely. I would even agree that the copier could go as long as you had a good scanner and printer. Yet, in my practice, there is still a need for the trusty typewriter.

Don't get me wrong, whenever possible, I will scan a document and use Adobe to fill it out. But, there are some of the agencies with which I regularly work that will require things filled out in triplicate using the carbon forms of many colors (usually white, pink, and yellow). There, Adobe just won't work while my swing key Royalite '64 typewriter works like a charm.

I would agree that 99% of the time I could live without my typewriter, but I still need it often enough that I probably won't be getting rid of it until those awful triplicate carbon forms are gone forever.

Friday, August 22, 2014

JUDGES GOING PAPERLESS -- SOME FOOD FOR THOUGHT

In my legal career, I've had to veteran attorneys I've considered mentors. The first was the senior partner at my first job. I learned more from him about the nuts and bolts of practicing law and legal thinking than I would have ever admitted to myself when I was there. Funny how time and distance can help you realize things that you were too blind to see at the time.

My second mentor is my current managing attorney. Less skilled at the nuts and bolts - though I think that is a bit of a show on his part - one of the messages he has drilled in has been the importance of knowing your judge. It is much easier to get a ruling you want if you know how your judges tick, and what arguments that each particular judge is receptive to. Perhaps even more important than the substance of the argument is what forms of delivery they prefer.

On August 21, Above the Law had an article about a judge's exclusive use of digital documents. Briefs, motions, everything was done electronically. He had gone paperless on the bench.

My first thought was "wonderful, we've got another convert, even if he is using an iPad". My second thought was of my mentor in my ear asking, "now that you know this about the judge, what would you do differently if he was your judge?"

This is a question I haven't had to deal with yet, but I think it is just a matter of time before this makes its way to my little slice of Ohio. So, I took the question seriously: what would I do differently?

The first thing that comes to mind that I would want to reconsider is the formatting of my briefs and my choice of font. A font that is good for reading in print is not always good for reading on a laptop or tablet. A little extra space between the lines and unjustified alignment are probably better online than in print. A serif font is critical to reading in print, but a sans serif font has usually been the better choice for online consumption reading.

So, one of the real take aways from this post: if your judge is doing his reading on his tablet or computer, do you change your font and typography to match? No answers today, just a question.

Thursday, August 21, 2014

OTHER WAYS TO ADD ATTACHMENTS TO AN EMAIL IN OUTLOOK

Ok, this tip is probably most useful for those that are using two monitors. Of course, if you're not using two monitors, I can't encourage you enough to add that second screen.

A lot of people will add an attachment to an email by composing the email, hitting the attachment button, then locating the attachment in the file directory.

However, if you have a copy of the file you're going to be attaching on your desktop or open in file explorer, you can just drag the file on to the mail tab in Outlook.


By doing so, you will open up a new email with the document already attached.

Alternatively, you can right click on the file and choose "send to" and "mail recipient", which has the same effect.

The big point: there's usually more than one way to accomplish a given task. Find the one that works best for you.

Friday, August 15, 2014

YEAH, YOU SHOULD PROBABLY USE 2-STEP VERIFICATION WITH GOOGLE

If you haven't noticed by now, I am a Google fanboy. I'm not ashamed of that; I openly admit it. Yet, in those moments when I think about it closely, it is amazingly scary the amount of information Google knows about me and the extent to which I trust Google.

It keeps track of some of my passwords via Chrome. Google's Android OS runs my phone and is synced with my Google account. My email, my documents, and who knows how much else are all with Google in one way or another it seems.

To put it mildly, if my Google account were hacked, the amount of damage that could be done is downright scary. I imagine this is the case for nearly anyone with a Gmail account or using any of Google's apps or who has an Android phone.

With that amount of exposure possible, I think it makes sense to use Google's 2-step verification. Basically, to access my Google account on a non-trusted device (think trying to access it at the public library), not only will I have to put in my Google password, but then I will get a text message on my phone with a verification code.

Unless someone has both my password and my phone, they will be unable to get into my account. Moreover, if someone does guess my Google password, I'll get the text message and know that someone's trying to get into my account.

Yeah, it might be some initial work setting up and a bit of a pain when trying to access your account in new locations, but the peace of mind that comes with the increased security is more than worth it.

You can set up 2-Step verification for your Google account here.

Thursday, August 14, 2014

SWITCHING USER ACCOUNTS IS NOW EASIER IN CHROME CANARY

In case you're not aware, there are multiple versions of the Chrome browser available for use on your desktop or laptop. There is the completely stable version of Chrome, a Beta version that I've found to be very stable, and the Canary version, which you can think of as the Alpha version.

The advantage to using the Beta or Canary version is that you get some of the upcoming features in Chrome early and can provide feedback on their development. The trade off is that sometimes the features aren't fully debugged, and so, the browser might not always be reliable. There have been updates with Chrome Canary that I can hardly use it and have to wait for the next update.

However, I like to see what is coming and trying out stuff early. And the thing I noticed for the first time today (though it could have happened a few days ago and I never saw it) was the addition of a button in the top right that is supposed to make switching users easier.


When you click on it, you can add your other users' accounts, or perhaps you can have a work and personal account, which is why I'm so excited about this.

When you switch to the other user, it then opens a new window with the other user running, thus allowing you to have multiple instances of Chrome running but with different users. And lest you get confused as to which account is in which window, the task bar will let you see the difference.


At any rate, for those who have a work and personal gGoogle account, or where multiple users are using the same computer, this is a welcome addition to Chrome. Let's hope it makes it to the Beta and Release versions soon.

Wednesday, August 13, 2014

EASILY INSERT SCREENSHOTS INTO YOUR WORD DOCUMENT

Previously, I explained how the Snipping Tool made it easy to grab screenshots and save them. Today, I want to show how Word 2010 has a similar feature built right in. And if you're using two monitors (you're using two monitors right?), then it is incredibly useful.

To locate the feature in Word (or most of the MS Office suite products), go to the Insert tab on the ribbon and click on Screenshot.


If you have two monitors, the entire second monitor will be one option you can instantly insert. The other options will likely be other windows you have open behind your instance of Word. Clicking on one of the thumbnails will instantly insert the entire window or monitor into your document.

If instead you click on the Screen Clipping, then your entire screen will go light gray (just like the clipping tool). Then, you can select what you want to capture and draw a box around it. The selected area will be inserted into your document automatically.

If you're using just one monitor, then you need to make sure that the information you want to capture is the last window you had opened prior to opening Word for this to work.

I use this method when I am working in Word and sending email in Outlook. I use the clipping tool when I want to save images of my desktop as image files. Both methods work to accomplish the same thing, but each is convenient under different circumstances.

Monday, August 11, 2014

QUICKLY CREATE NEW CONTACTS FROM AN EMAIL IN OUTLOOK 2010

A lot of lawyers tend to have all of the information they would normally have on a business card pasted to the bottom of their email in a signature block. Outlook makes it very easy to add this information to your contacts list.

Simply drag the email from your inbox to the Contacts tab in Outlook 2010.


This will bring up a new contact card and already have some of the contact information filled in. Additionally, in the notes section of the card will be the email. You can highlight and drag the relevant portions of the contact information to the respective fields on the contact card. This way you don't have to worry about mistyping any of the information.

Once you have all of the information plugged in, you can simply delete the email from the notes section of the card and hit save.

Now, you've quickly added all of the sender's information to your contacts list. And it was much simpler than retyping it all.

Wednesday, August 6, 2014

USE TASKER TO KEEP YOUR PHONE UNLOCKED WHEN IT'S SAFE

I've previously discussed how incredibly important it is that we keep our phones locked so that prying eyes can't see any of our client confidential information that may be on them. Of course, that doesn't mean that constantly having to unlock your phone isn't a pain. Especially when you're in the office or at home.

Tasker and the Secure Settings plug-in can help with this. For example, I have my phone set up so that if I am on my home WiFi network or if my Smartwatch is connected, it won't ask me for my PIN. Of course, when neither are connected, it will then require a PIN to unlock it.

As a practical matter, this means that nearly any time I want to use my phone, I don't have to unlock it, but if anyone outside my house were to try to use it, it would be locked. In this way, the security doesn't become a nuisance and lead to it not being used. The best part, at least on the Galaxy S4 and the older Galaxy Tab 10.1, you do not have to be rooted to do this.

For those unfamiliar with Tasker, it can be intimidating. It is definitely geared towards those who are willing to spend some time learning it and learning to think like a programmer at least a little. Not much more than basic logic, but I feel obliged to make that announcement.

Now, let's walk through how to do this so that when you're connected to a particular WiFi router you won't have to put in your password.

To start, purchase and install both Tasker and the free Secure Settings plug-in.

Next, open up Tasker and click on the profile tab. Then click on the "+" in the lower right. Then, choose State.

Next, choose Net and then WiFi Connected. This tells Tasker that you want to create a profile that will run whenever you connect to a particular WiFi.

On the next screen, I would recommend filling in the the SSID line with the SSID of the WiFi network you use. For example, if the name of your office WiFi is "LawFirm", you would put in LawFirm. Case counts. If you leave it blank, then this will run any time your WiFi connects, even if it is just some open WiFi network.

Next, hit the left arrow at the top. This step, for me at least, was not entirely intuitive.


Next, a little popup will ask you what task you want to do. Click on "New Task +", and you can just hit the check mark instead of giving the task a name.

On the Task Edit screen, click on the the "+" at the bottom. This time, choose Plugin and "Secure Settings".

On the Action Edit screen, click on the pencil next to Configuration. Choose "Dev Admin Actions". Then choose "Password/Pin".

On the next screen, check the Device Admin Enabled box. Then save this setting by clicking on the save or diskette button near the top.

This takes you back to the Tasker Action Edit screen. Click on the left arrow as before in the top left to get out of the action edit screen. Do it again to get back to the profile screen. Now, when your phone connects to the WiFi network you listed, it will no longer require you to put in the password (Note, you might have to turn your WiFi on and then off to get it to take effect, and there is sometimes a small lag time).

Of course, you will want the password to come back when you leave the WiFi network. To do this, on the WiFi Connected profile you created, tap and hold on the Secure Settings Clear Password after the green arrow. This will bring up a popup where you can choose to "Add Exit Task".

Again, choose to add a new task, click the check mark, and add a new task. As before, you will be adding a plugin and secure settings. Click on the pencil next to Configuration, then Dev Admin Actions, and Password/Pin.

This time, click on the "Disabled" button. Choose either the Password or Pin Code radio button and put in the password or pin you want to use. Save, and back out to the profile. On your profile you should have both a green arrow pointing right and a red arrow pointing left for your WiFi Connected profile.

Now, whenever you connect to your WiFi network, your phone will stop asking for a password, and when you disconnect, it will start asking for a password again.