Wednesday, December 18, 2013

GET DYNAMIC EXHIBIT STAMPS FOR ADOBE PRO

As you move from a paper-bound practice to a paperless practice, the value of Adobe Pro increases. In a paperless or semi-paperless world, the ability to manipulate .pdf files is incredibly helpful. If you practice in federal court, at least in Ohio, the ability to create and manipulate .pdf files is essentially a requirement.

One of the missing features of Adobe Pro out of the box, at least from this attorney's perspective, is an exhibit stamp. Something that easily allows you to stamp a document as an exhibit to be attached to a pleading or motion that has the look and feel of a rubber exhibit stamp.

Fortunately, Rick Borstein at Acrolaw blog developed such a stamp. I would encourage everyone to read his post in full as it goes into detail about this stamp and how it works. You can download a copy of the file an installation instructions here.

The short version is that once you install it, it adds a new stamp to your stamp palette called Exhibit Stamp, which will contain two types of exhibit stamps.
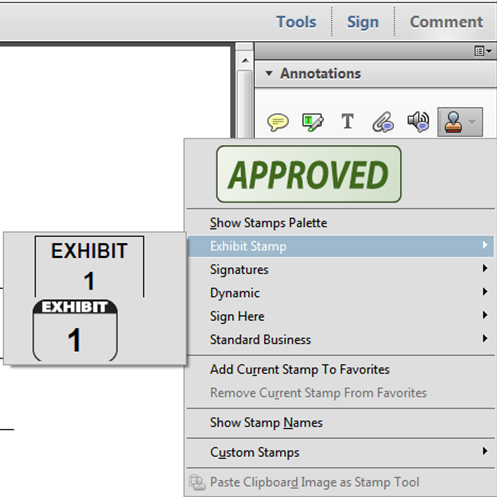

When you click on your preferred stamp and place it in your document, a window will pop up that asks you what number, or letter, or text you want to place in the stamp.


Once you hit OK, you will now have a movable stamp with your own text in it that can be re-sized or re-positioned as you see fit.

When you are finished adding your stamps, you can flatten your document and the stamps will become a permanent part of the file.

So if you are regularly handling documents electronically, this offers a much cleaner and quicker solution than printing out the documents that need stamped, stamping them, and re-scanning them.

Tuesday, December 17, 2013

GOOGLE TIPS WILL SHOW YOU WHAT GOOGLE OFFERS

I'm a huge fan of Google and the Android operating system. I have played around with many of Google's apps and and regularly use a number of them. Yet, things change regularly and new features are added frequently and it is helpful to have a place to see what all Google currently offers.

Whether you are new to what Google offers or already know a lot about Google, it is worth checking out Google Tips. Here, both new and old users are likely to learn tips and tricks for how to get the most out of what Google offers.

h/t The Droid Lawyer

Monday, December 16, 2013

ASSIGN A KEYBOARD SHORTUCT TO A MACRO

In the last post, we talked about how to add a macro to the Quick Access Toolbar. For those that like to click, this is a good option. If you're like me, you would rather just type in a key combination and have your macro run automatically. Word 2010 makes this very easy to set up.

To do this, go to the File tab on the ribbon and choose option. From in the options, click on the "Customize Ribbon" option in the left column. Then, near the bottom, click on the "Customize" button after the words "Keyboard shortcuts:"


This will bring up the Customize Keyboard window.


Under the Categories list, scroll to the bottom and choose Macros. Then, under the Macros: list (it will pop up after choosing Macros in Categories) choose the macro you want to assign a shortcut key to. Click in the "Press new shortcut key:" box and type in the key combination you want to assign to run your chosen macro. Lastly, click the "Assign" button in the lower left of the window.

Now, whenever you are in Word and type in your shortcut combination you assigned, it will automatically run your macro. Some people will find this easier to use than either opening the macro window or clicking on a button in the Quick Access Toolbar.

Friday, December 13, 2013

PUT COMMONLY USED MACROS ON THE QUICK ACCESS TOOLBAR

There are lots of ways to access macros in Word 2010. You can access them through the macro window, you can assign a macro to a hot key, or you can assign a macro to the Quick Access Toolbar and run it from there. Today, we're going to focus on the latter. If you're not familiar with the Quick Access Toolbar, it is a new feature not present in Word 2003 and prior versions. By default it sits at the top left of the Word window, though you can have it sit below the ribbon if you prefer.


The quick access toolbar is designed to always have displayed commands you frequently use. This way, you don't have to click through the tabs in the ribbon to find the command you want to use. I find the default settings for what is displayed to be fairly unhelpful. But, you can customize it to include the things you actually want up there. For me, include buttons to run macros I frequently use.

To do this, you need to pull up the customize Quick Access Toolbar window. Click on the drop down arrow at the far right of the Quick Access Toolbar and choose "More Commands".


When the window opens, to add a macro, you need to click on the "Choose commands from" drop down and select Macros.


Then, simply highlight the macro you want to have added to the Quick Access Toolbar, click the "Add > >" button and choose OK at the bottom of the window.


Now, Word 2010 will have your selected macro in the Quick Access Toolbar. When you want to run your macro, you only have to click on it at the top of your screen.

Thursday, December 12, 2013

SPOTIFY ON MOBILE

In case you're not familiar, Spotify is a music service that let's you play your favorite songs whenever you want. Best of all, it was always free on the desktop (ad supported of course). However, to get it on your mobile phone, you had to pay a monthly fee.

I've been a big fan of Spotify for well over a year now, and I actually prefer it over other streaming services like Pandora because I get to choose the songs I want to hear when I want to hear them. But I never could justify spending the money to get it on my phone.

As of yesterday, Spotify is now free on your mobile device. When you log in, you can listen to your music, ad supported, as well as listen to radio stations built around songs you like. It even has your playlists from the desktop version. The only catch is that you can't choose when to play your songs in your playlist. Instead, it is always on shuffle mode. A small price, as far as I'm concerned, to be able to listen to my music on the go.

All-in-all, if you're already a Spotify user, you've probably been waiting for this day for a while. If you're not using Spotify, what are you waiting for?

Wednesday, December 11, 2013

CODING THE LAW

I grew up with a father in the IT business. I remember learning to code in BASIC on a Commodore 64 and an Apple II in elementary school. While I have never taken any formal computer science classes, I have taught myself enough about coding to work on a few side projects related to the practice of law.

One of my recent projects was to actually create a website that calculates the amount of food stamps a person is entitled to. The easiest part of this project was reading the Ohio Revised Code and Administrative Code and learning the rules for counting income, deductions, and the various tests. It was breaking those rules down into manageable chunks that could be understood by a web browser, which is not so different from explaining it to a lay person.

In doing this project, I learned all of the ins and outs of the food stamp program, and I now have a much better grasp of the rules surrounding it. In addition, our program now has a useful tool in the form of a website that will help us determine whether our clients' food stamps are being properly determined.

I would encourage everyone to look for areas of the law that lend themselves to being coded and to give it a try, particularly if it is your area of specialty. Doing so will give you a deeper appreciation for the law's nuances and help you see the law at both the micro and macro level.

SAVE TIME BY PINNING TO THE TASK BAR

One of the great features of Windows 7 is in the task bar. You can easily "pin" programs you use regularly to the task bar. I've found the simplest way to do this is to have your program open, right click on it in the task bar, and click "pin this program to task bar".


As I regularly use Word 2010, Chrome, and Windows Explorer. They are always pinned to my task bar.

Once you've pinned a program to the task bar, you can right click on it, and it will show a list of the recent files you've opened within that program. So, by right clicking on my Word 2010 icon, I get a list of the last ten files I've opened.

It seems we often open the same files and templates regularly. With Windows 7, you can also "pin" a file you use regularly (or any file) to the list of recent files so that they always show up at the top of the list.

To do this, just open the file you want to have pinned to the top of the list. Right click on the Word icon in the task bar, and it will probably appear at the top of the recent files list. To the right of the file name will be a picture of a pin. Click on this pin, and the file will now always appear at the top of your list.


By pinning frequently opened programs to the task bar and frequently used files to the program list, you can save a lot of time. It is much simpler to right click on the task bar and select the regularly used file than to go through the start button or windows explorer every time.