Showing posts with label tech tip. Show all posts

Monday, August 29, 2016

If You're Not Using Quick Parts and Auto Texts, You're Wasting Time and Money

It's an old adage that, as attorneys, our stock in trade is our time and advice. Accordingly, wasting time on technology is not only wasting time, it is wasting money and resources. If you have technology in front of you that can save you time and you don't use it, then you are wasting your time. Quick parts in Microsoft Word is one of those technologies that not everyone is aware of that is sitting right in front of them. So let's learn a little bit about quick parts.

First, in Office 2016, it feels like they have made quick parts and auto text harder to find. If you go to the Insert tab on the ribbon, you'll find them under the text group. If you have too many items on the ribbon or less screen real estate you might only see the icon. I've circled what you're looking for in this picture:


As you can see, if only the icon is displaying, you have to already know about quick parts to find it. At least, that's how it seems to me. Here's a better picture of just the icon you need:


Now that you've located it, what do you do with it? If this is the first time you've even looked at that icon, there's not much to do.

Yet.

While Microsoft does some fantastic work and there's a reason that its suite of office products is basically the standard everywhere, it hasn't yet figured out how to read your mind. It doesn't even use the type of machine learning that can pay attention and figure out how it can save your time. Instead, we still have to tell Word what can save us time.

Let's start with something simple. Something we lawyers probably use on a regular basis: a pleadings signature block. Including formatting and margin settings and tab stops, here's what mine looks like:
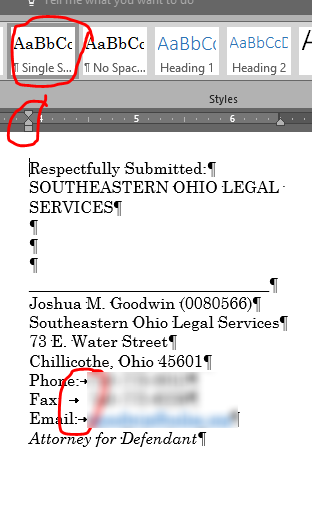

As you can see, there is some special stuff going on here that a simple auto correct is not going to be able to cover. It uses a specific single spaced style. The left margin is set to slightly less than 4 inches, and I use a custom tab stop to line up my phone, fax, and email. Doing all of this from scratch every time is tedious at best, likely to produce the occasional typo, and a waste of time. You could keep a master signature block somewhere I suppose and copy and paste from it, but even that's tedious to me.

This is where quick parts and auto text shine. On my system, I have this set as an auto text. This way, when I start typing "respectfully submitted", Word asks if I want to insert my signature block:


Isn't that helpful? Now, anytime I want to put in my signature block, I just start typing it and Word asks if it can do all the hard work for me. If only everything in life worked this way; I get out the cutting board and my kitchen asks "Can I go ahead and instantly make your favorite meal, a nice paneer curry with naan and jasmine rice? It will be exactly the way you like it, of course."

Of course, this culinary example illustrates a potential problem with using auto texts. What if I didn't want curry but was getting out the cutting board to chop up a carrot for my kids? I could ignore the prompt and just keep going. But what if I wanted to type respectfully and hit enter. If I do that, it will assume I want my signature block.

This is the potential problem with auto text: it can make assumptions you don't want it to make. So you either have to use specific names that are unlikely to have you pressing ENTER afterwards, or you need to use a different method. Fortunately, Word provides that different method with quick parts.

Quick parts functions similarly to auto text in that both insert blocks of formatted text. But the way you access them is different. Auto texts appear when you start typing the name you've given the auto text. Quick parts do not. Instead, with quick parts you start typing the name of the quick part and hit F3. OR, you click on the quick parts icon and choose the block of text you want.

With quick parts, your quick parts show up immediately in the quick parts icon. Auto texts do not show up like this, which can make them a touch slower to access if you don't remember what you named the auto text.

Now for the part you've probably been waiting on: How do I actually make the darn things? It's surprisingly easy.

First, type and format the text you want turned into a quick part.

Second highlight that text.

Third, click on the quick parts icon. In the menu that comes up, if you want to save the item as a quick part, choose the "Save Selection to Quick Part Gallery..." option. If you wish to save it as an auto text, choose Auto Text and then select the "Save Selection to Auto Text Gallery..." option.

It will then open a window that looks like this:


By default, it will suggest a name that is the first couple words of your selection. You can change this to whatever you want. The name you give it though is going to be what you type in your document to get it to automatically add the auto text or quick part text. You can then select whether you want to save it as a quick part or auto text. You can categorize your selections (perhaps signature lines, discovery, pleadings, etc.). Lastly (at least as far as this post is concerned) you can choose whether to save this in your normal.dotm file or another setting. I almost always choose normal,dotm so it is available regardless of what document I'm typing in.

Click on OK, and you now have your quick part or auto text ready to use.

I do not recommend going out and setting up a bunch of these in a rush just to get started. Instead, be conscious of what you're typing for a week. If you find yourself typing the same thing a couple of times in a row, then go ahead and add it. If you try to think of everything in advance, odds are you will forget what you named your quick part and will forget to use it.

So, get out there and start saving yourself some time and stop wasting resources on typing the same thing for the 100th time this month.

Friday, March 20, 2015

An Easier Way to Find Your Phone using Your Android Wear Device

In the past, I explained a method of ringing your phone using from your Smartwatch using Tasker.

Yesterday, Google made my whole post obsolete. And I couldn't be happier.

Now, you can tell your watch to your phone without using Tasker. According to Google, all you have to do is say "Ok Google. Start. Find my phone". Personally, this did not work for me. It instead brought up the option of opening the Google blog post I described above.

Instead, I use "Ok Google. Start app find my phone", and it seems to work nearly every time. Of course, if you're using Android Wear Mini Launcher, you can just swipe right across the top of the watch one time and find the "Find my phone" app directly.

Launching the app will cause your phone to ring at full volume. Assuming your phone is close enough to be connected to your watch, this is an incredibly easy way to find it. Especially useful for finding that phone buried under the mountain of paperwork on your desk.

Monday, March 9, 2015

Plan For the Loss of a Mobile Device Now

I spent a couple of days last week in New York talking with some very smart people about automated document production in the legal profession geared primarily towards pro se individuals and legal services advocates. On the way back to Ohio, I had a layover in D.C. During the flight from LaGuardia to D.C., I took a nap. I placed my tablet in the seat back pocket. Upon waking, I completely forgot that I had done this and left the plane without picking up my tablet.

It wasn't until half an hour later as I was waiting at the next gate that I realized what had happened. Fortunately, I was lucky and was able to get it back without too many problems. But, as I stood there waiting for an answer as to whether my device had been located, I began to think about what to do in the event that my device was lost. It wasn't something I had put much thought in to before. After all, I've lost more wedding rings than mobile devices (true fact).

Today's message: don't wait to think about what to do if you've lost your device. Some things to think about would include ways to locate it using GPS. Perhaps a message on the lock screen containing information about what a good Samaritan can do to return the phone. And, of course, ways to completely wipe all information from the device remotely if it isn't found and returned. This is especially important if it is a device that contains confidential information.

This latter point is worth thinking about a bit. I've pulled that trigger one time just to see how thorough a remote wipe was. It was very, very thorough. Nothing left. I had backed everything up ahead of time because I knew in advance what I was going to do. Odds are, that won't be an option if you've misplaced your phone. So, if you haven't got a backup plan you're following, probably a good time to think about that as well.

Wednesday, February 25, 2015

A Pictorial Guide to Signing PDFs On Your Android Device

You get an email with a .pdf document attached. You're on the road and check it on your phone. Everything is in order, it just needs your signature. You despair because there's no easy way to print it from your phone, sign it, scan it, and send it back. Sure, if you're lucky enough to have Adobe Pro back at the office, you could handle it on your desktop. But, that's far away from where you are now. What to do?

Fortunately, the Adobe Reader app for Android phones (maybe for iPhones, but I don't know since I'm Android all the way) makes this exact scenario a thing of the past. With the Adobe Reader, you can sign your .pdf documents easily and free of charge from your Android powered devices. Today, I'm going to walk you through how to do that.

First, make sure you have the Adobe Reader app on your device. Then, open up your .pdf file in Adobe.


Now, tap in the middle of your document, which will change the bar at the top to look like the following:


Choose the pen (the last tool on the right), and you'll receive a toast message telling you to tap on the screen at the location you want to insert your signature. I'd choose right on the signature line.


Once you've tapped where you want your signature to go, you'll be taken to a screen where you will be asked to sign your name. Simply do that. Sign your name. You can modify the look of it with the controls at the top. When you're done, tap the check mark.


After a brief dialog asking you to give your signature a name, you will be taken back to your document, but it will have your signature added in now on the signature line.


If you want to modify your signature's appearance on the page, simply tap on it. You will be given options to modify how it looks as well as to re-size it and move it to a different place on the screen.


You now have a saved document with your signature on it, ready to return by email, print, or whatever else you want to do with it. Even better, when you go to sign something else, it will remember your signature and give you the option of simply inserting it.


So, why would you ever use this? Well, for starters, it eliminates the scenario described at the top. IT saves trees. Moreover, if you have a document you want a client to sign, you can have them just sign your phone.

Wednesday, January 28, 2015

The Beginner's Illustrated Guide to Tables of Authorities in Word

Okay, by now we all are aware that Microsoft Word can help manage the table of authorities in your brief. Yet, how many lawyers actually use this function let alone understand how it works? How many legal assistants understand it? How many times have you tried to use this function only to give up and go back to doing it by hand and hoping it all worked out well?

I understand. I don't think it is a well-documented feature. Yet, once you know how to use it, you will not go back to doing it by hand. 

So, let’s dig into an image intensive look at how to actually let Word create the table of authorities for you. This will be a lengthy post, but I think seeing screen shots of what to do will make it easier to figure out what to do.

First, write your brief. Do not, I repeat, DO NOT, try to mark your authorities as you write. It will make your life more complicated. I typically mark my cases for inclusion in the table of authorities when the text of the brief is finished and I’m cleaning up all of my citations. I might make some minor edits, add a paragraph here or there after I do this, but I’m not adjusting the order of citations.

Once you brief is finished, start at the top of your brief and find the first citation. Highlight the entire citation. Go to the References tab on the ribbon and click on “Mark citation”.


 This will bring up a new window. The first citation in your brief will of course be a full or long citation, and it might even have a pinpoint to the page number in the reporter. In the “Selected Text” box will be the citation you had highlighted. Edit the text in this box to be what you want to show up on the table of authorities. For example, I would remove the pinpoint citation in this example.


On this screen, you will also need to ensure that you have the correct category selected for this citation. Since this is a case, I have selected Cases. Ignore the other areas of this window for now and choose the “Mark” button.

After you click “Mark”, you will be taken back to your document. 


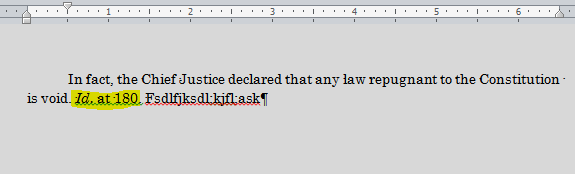
If you weren’t showing paragraphs marks (you didn’t have the pilcrow selected on the Home tab) you may be surprised to see a completely different looking document. It will look something like the below. Of note, the highlighted information is the information added, but don’t worry, it won’t show up when you print. Unless you know what you’re doing, DO NOT EDIT THE ADDED INFORMATION. Editing it will affect how your table of authorities is built.

Repeat this process for every new citation you come across. Of course, eventually, you will come across a short citation or an id. citation. In that case, you will highlight the short citation and choose mark citation as before.


This time, when the window pops up, simply click the case name in the short citation list that the citation you are adding points to.


 So, in my example, I’ve highlight an Id. in my document, but it points to the Marbury case, so I choose Marbury from the short citation list. If the short citation is not a case but a statute, make sure you look in the correct category. Once highlighted, choose Mark.

Once all of your citations are marked as set out above, go to the point in your brief where you want to insert a table of authorities. Put the cursor on that spot. Then, go to the References Tab on the ribbon and choose “Insert Table of Authorities”.


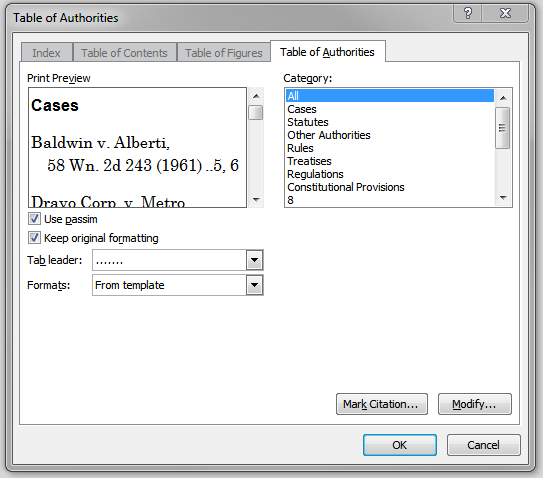
 This will pull up a new window. You can modify how your table will look in this window. 


For now, we’re just going to insert the table. So, make sure you have “All” selected under categories. If you only wanted to insert some of the categories, you could do that here. Note, it will only insert categories that actually have items in them. So, if you have no Rules, it won’t display an empty Rules area. Next, choose “OK”.

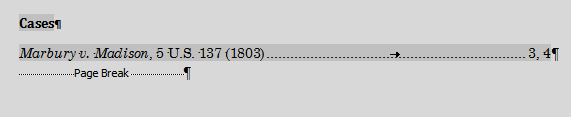
And, as you can see, you now have a wonderful looking Table of Authorities. 


Now, let’s say you have added other pages or moved some items around. No problem. Prior to finalizing your brief for printing and saving, turn off the option to show formatting (again, the pilcrow on the home page). Next, right click on your table of authorities and choose “update field”.


 In my example, I added a whole new page. As you can see, this automatically updates all of the page numbers.


It is important that you not be showing formatting marks when you do this. I’ve found that the length of the information added by mark items for the table can do weird things to the page numbering IF you have it showing when updating fields. So, if your page numbers seem off, that may be why.


That’s it. It really isn’t that hard. And the time and headache it can save with manually checking the page numbers and updating it when you make little edits more than make up for the time it takes to actually follow this process.

Monday, January 5, 2015

Tips From Legal Office Guru on Tables of Authority

Hope everyone had a merry Christmas and Happy New Years and all of that. I know I enjoyed a couple weeks away from the office and mostly disconnected. However, now it's time to get back, and I'm looking froward to a new year of blogging.

To get the new year started, I wanted to point out a great post over at Legal Office Guru that discusses common errors in creating tables of authority in Microsoft Word. I'll admit that I've learned the hard way why this article hits the nail on the head.

I hope to have a post up this week doing a walk-through on how to do it right.

Friday, December 19, 2014

Universal Copy and Paste with Pushbullet

I've mentioned my fondness for Pushbullet in the past. You can easily send links to websites from one device to another, as well as receive notifications from your phone on your desktop. You can even send SMS messages from your desktop.

One of the features I've been using more and more lately is the ability to copy and paste text from one device to another. For example, suppose I'm working on something on my tablet and need to insert a block of text that is on my computer. With Pushbullet's universal copy and paste, I can highlight and copy the text on my desktop. Then, after waiting a second or two, on my tablet, I simply choose paste where I want the text I copied on my desktop to go.

To enable this, on all of your devices you want to be able to do this, simply open up Pushbullet's options and enable Universal Copy and Paste.

Wednesday, December 17, 2014

Tasker for Attorneys: Have Your Android Wear Watch Find Your Misplaced Phone

When I have my Galaxy Gear Live connected to my phone, it automatically turns the volume and vibration off on the phone. Of course, if I then misplace my phone under a pile of papers in the office, I can't find my phone. With the volume down, I can't just call it. How can I find it quickly and easily?

Fortunately, Tasker can come to the rescue.

First, get Tasker. Yes, it is a paid app. But it is worth the price of admission for the control and automation it can bring. To increase the usability with your Android Wear Watch, get WearTasker as well.

In Tasker, the first order of business is to create a variable. On the Tasker home page, go to the VARS tab. Add a new variable and call it %FOUNDPHONE.

Next, create a new task and call it “Kill Ringer”. The only action that we’ll add to this task is to set a variable. So, add a new action, choose the “Variables” action category, and choose variable set. The name will be %PHONEFOUND. Set it to 2. Save this task.

Next, in Tasker, go to the TASKS tab and create another new task. Give it a name you find useful.

In your new task, add an action. Choose the Variables action category. Then choose Variable Set. The name of the variable to set is %FOUNDPHONE. Set it to 1.

The next action to add is to increase your phone's volume. Select the Audio action category, and choose ringer volume. Set the volume to 7 or higher so that it will ring loudly.

Now, add another action. Choose the “Media” action category. In there, choose “Play Ringtone”. The type should be “ringer” and stream should be “Alarm”. Under if, the first box should be %FOUNDPHONE, the sign should be equals, and the third box should be 1. This step is important. If you don’t set the ringtone to only play when the variable = 1, then it might ring in an unceasing loop. That would be annoying, to say the least.

The next action we’ll add is a pop up. This way, when you find your phone, you’ll be able to easily quiet the ringer. Add a new action, choose the “Alert” action category, and then choose “Popup Task Buttons”. Under the Text, put in something like “Found my phone”. For mode, choose text. For task, you’ll put in Kill Ringer. Lastly, set the Timeout (Seconds) slider to 60.

What this does is create a popup on your phone with a button that says “Kill Ringer”. When you push the button, it runs the first task we created, which sets the %PHONEFOUND variable to 2, which stops the ringer. Also, the popup will disappear after 60 seconds.

The last task we want to add is to again set the %PHONEFOUND variable. This time, set it to 2. This way, if the previous popup disappears due to the timeout, your phone will stop ringing.

Now, leave Tasker and go to WearTasker. Click the floating action button at the bottom and choose “Add task”. The task to add will be the one we just finished creating in Tasker. Save and exit.
WearTasker will update your watch with this task. When you open WearTasker on your watch, it will have a button with the name of your task. Pressing it will run the task, increasing your phone’s volume and causing it to ring.


Now, when you misplace your phone in your office with the volume low, you’ll be able to quickly and easily find it.

Monday, December 8, 2014

How to Add Bates Stamps using Acrobat Pro

Whether dealing with vast quantities or even a few dozen discovery documents, organization is critical. Bates Stamping documents makes staying organized much easier. However, if you have Acrobat Pro and are still using an actual Bates stamp or machine, you're making life much too difficult.

For those unfamiliar with Bates stamping, it is a system of putting a prefix and incremental number on the bottom right corner of every page. For example, if I received 100 documents from Plaintiff Smith, I might put SMITH 00001 on the first page, SMITH 00002 on the next, and so forth. Physically stamping this way used to be the practice, and I'm sure some still do that.

But, let me show you how I do it.

First, if you haven't already done so, scan all of your documents into a .pdf file. Save the file. I typically will give it a useful name and then add the word "clean" to the end. This tells me that this is my original, unnumbered set of documents. I then make a copy of the file and add the word "bates" to the end. This is the document I'll number. It is also the document I'll be using from here on.

Open that file in Acrobat Pro. From there, on the right side drawer, go to "Tools" -> "Pages" -> "Bates Numbering". Choose to add bates numbers.

This will pop up a new window. Choose to Add documents and select add open files:


Choose the open file you want, then select Ok. Hit Ok again and you will see a new window open up:


Put the cursor in the "Right Footer Text Box" and then click the "Insert Bates Number" button. In the new window, put in the prefix you want to use remembering to put a single space at the end. You can adjust the starting number and number of leading zeroes if you like. Select Ok and then Ok again.You now have a Bates numbered document, which will help with organization.

Monday, December 1, 2014

Use Tab Stops to Line Up Words in Microsoft Word

I've talked in the past about the importance of using the left indent instead of the space bar when adjusting where to start text on the page. This addresses how to align the left margin of blocks of text. But, what about aligning items in the middle of a sentence?

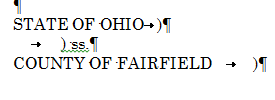
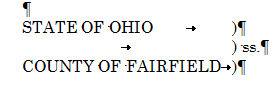
For example, let's look at the top of an affidavit in common use in Ohio:

The goal here is to align the closing parentheses vertically. I've received a number of documents from colleagues where they are almost aligned, but not quite:


The reason for the misalignment is simple. The drafter used the space bar to try to line everything up:


There are a number of problems with this method. First, it will rarely result in having everything lined up vertically unless you are using a monospaced font.  As Butterick says in Typography for Lawyers, "There are no good reasons to use monospaced fonts. So don't."

Second, fixing typos can be a pain. If you notice you made a mistake with the space bar method, you will likely have to go back and fix all of those spaces again, which can be a headache.

Lastly, it is time consuming. You end up spending a good deal of time trying to get the alignment close only to end up with imperfect results.

Instead of using the space bar, set tab stops. Here's how I would create the alignment. 

First, type in your text and insert a single tab between the last word and the closing parentheses. So, when you're done, you'll have something that looks like this:


Those arrows pointing to the right indicate the press of the tab key. So, how does this help us? Now, when you adjust the tab stop, it will align those parentheses. To do this, highlight all three lines. Then, click on the top ruler to insert a tab stop where you want the parentheses to line up:

This will add a tab stop on your ruler, which I have circled above. Now, your parentheses will all be perfectly aligned. 


If you need to edit the location of the parentheses at any point, simply highlight all three lines and click and drag the tab stop in the ruler to the new location. 

Using this method will save you time and headache and result in a better end product than using the space bar.

Wednesday, November 26, 2014

Get Docs To Go For Free (Limited Time)

Docs To Go is a good document editor for Android phones. I'd say it may even be one of the better ones out there. The lite version is good, but limited in some areas. The premium version is normally $9.99. Today, it is free on Amazon. Not sure how long this will last, but check it out.

Monday, November 24, 2014

Free Stamps for Adobe

If you use Adobe for reviewing documents, then the AcroLaw blog has a free set of stamps for you. Recently, they explained how to add some pre-made stamps to your acrobat set up that will make Adobe an even better option for reviewing documents you receive in PDF format. Check it out here.

Thursday, November 20, 2014

If You're Using Inbox from Gmail, Here's Help In Understanding the Bundles

I've been a complete convert to Inbox. I think that it lays things out better than Gmail both on a phone as well as on the desktop. I also like the Bundles. I like all of my promotional emails going into one dedicated spot and only having them come through once a day. I find it helps me keep everything organized better. I know that I could have set up filters before, but I never took the time. Out of the box, Inbox does a good job of it.

If you're interested in learning more about bundles, check out this post from Gmail.

Wednesday, November 12, 2014

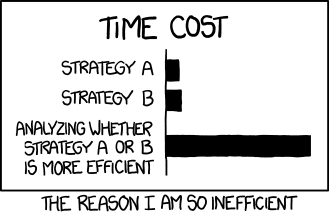
Stop Worrying About Finding the MOST Efficient and Just Make a Decision

I've mentioned this wonderful chart by XKCD a number of times. And I refer to it often to determine whether creating a particular time-saving task has any hope of actually saving time.

A couple days ago, XKCD put out another great chart on efficiency:


http://xkcd.com/1445/

I have recently sat through a number of meetings where we've had to consider a few different routes we could take, we wanted to make the most efficient choice between two relatively similar routes, and we end up wasting more time talking about the problem than we would ever save by trying to choose the most efficient method.

The above chart is a reality. It is important to realize you're in such a conversation, bring it up, and try to end it as soon as possible. In the tech world, this type of conversation seems to happen all the time.

Thursday, November 6, 2014

Write Email with Mobile Readers in Mind

Because I am on the road a lot, I read a lot of email on my phone. In fact, I will often scan an email on my watch before deciding whether it's even worth getting the phone out to read it.

Too often, people treat email like it is the electronic equivalent of a letter. They will put flowery language up front, ask about the kids, etc. I'm not saying that there is no place for that in email, but LifeHacker is absolutely right. If you want to ensure your email gets read, make your point or ensure the you grab the reader's attention in the first line.

Pay attention the next time you get email on your phone. Notice how little of the message you actually see. If you don't have some of the important stuff up front, it might not ever be opened by those of us who rely on our phones for email.

What about the subject line, you ask? I find subject lines to be helpful, but lengthy subject lines can get cut off sometimes. Focus on that opening line. Ask about the kids later.

Tuesday, November 4, 2014

Great Article on why You Should be Using VLC as your Media Player

In our office, we use VLC as our default media player. It's not the prettiest player out there, but as far as free player go, it works wonderfully. An article on LifeHacker today discusses some of the features I had no idea VLC could do. These things make what I thought of as a serviceable program great. Check out he article then do yourself a favor and get VLC.

Monday, November 3, 2014

IFTTT for Attorneys: Use your Watch to Let Your Assistant Know You're Coming Back

Because of where I work and what I do, I'm on the road. A lot. I have a main office in one county, and a satellite office in another. Additionally, our office covers seven counties and I often travel to an eighth for meetings and occasionally court appearances. All of this traveling can leave me sometimes running behind.

A smart watch and IFTTT can easily and efficiently help your secretary or assistant know when you are heading back to the office. In IFTTT, create a new recipe where the trigger or if statement is tapping a button on your android smart watch.

The then statement will be up to you. You can choose to send a text to your legal assistant if they prefer that method of receiving communications from you. Alternatively, you could choose to send her an email from your GMail account.

If you choose the email option, by default it will send a picture from Google maps showing your location as well as a link to Google maps. You can then add in a message at the top or on the subject line saying "Heading back to the office" or what not. Thus a simple tap of the button let's your office know where you are and they can have a decent idea of when to expect you back in.

Is it kind of nerdy? Probably. Do I care? Not one bit. I use this method to text my wife most nights to let her know I'm leaving the office.

Thursday, October 30, 2014

Quickly Create Outlook Calendar Events from an Email

When I receive an email with information about a meeting, I usually add it to my calendar instantly. This way, I don't forget about it.

I've watched a number of people want to add information to their calendar from an email and they complain about it being too cumbersome or taking too long. When I watch them, they will open up their calendar, navigate to the date they want, double click on the date, put in the time information, go back to the email, highlight and copy all of the information, go back to the calendar entry, and paste it in the notes. I usually will tell them that I understand why they don't like doing it that way.

Then, I show them how I do it. I always have the little calendar displayed in my To Do pane. If the meeting will be on a date displayed on that calendar, just drag and drop the email on to the date you want. This will automatically open up a new appointment entry, already have the date filled in, and already have pasted the text of the email into the notes section. All you have to do is add the time.

In the alternative, I will just drag and drop the email onto the calendar tab. Again, this opens up a new appointment window and pastes the email content into the notes section. All you have to do at this point is set the date and time.

Tuesday, October 28, 2014

Recent Updates to Android Wear were Much Needed

Recently, the Android Wear operating system got an update that was somewhat overdue in coming.

One of the first things of note was the fact that there is no longer a card covering the main watch face. It was ok having a card covering half of the face at times; however, it really detracted from the idea of having a watch. Now, instead of having a card always peeking up, you just have to swipe up to bring the first card up.

Second, Google Play music is now available on the watch. With a pair of Bluetooth headphones, you can listen to music straight from your watch.

Third, when streaming music, there always was a card that showed you what was playing, and if you kept swiping, to the left you would find other controls. Now, a swipe to the left brings up four different buttons: one to skip forward, one to skip backwards, and two to adjust the volume.

All in all, this was an update that really increases the usability of Android Wear supported devices.

Monday, October 27, 2014

Inbox for Gmail: Definitely Worth a Look

I've been a fan of Gmail for a while. Recently, Google launched their new email client, Inbox, in an invite only system for now. This invitation system is nothing new for Google to do. Yeah, it is probably unnecessary and it probably is, at least in part, a marketing gimmick. Yes, I'm probably being a Google apologist for not feeling some outrage at this system, yet, I just don't. What I will say, though, is that the Inbox app is slick.

I've only had a couple days to play with it, and I've spent most of those days moving boxes as we moved into our new home. However, there are a lot of changes in Inbox that I like.

First, the design. I'm normally more of a function over form person. However, I think that the look of Inbox is just wonderful. It showcases the material design of Android 5.0 wonderfully. It is also just easy to navigate and use.

In the current Gmail app, the only preset bundles are Social, Updates, Forum, and Promotions. Inbox adds additional useful bundles like travel, purchases, etc. This helps keep your email sorted. Yes, power users probably already have rules and filters set up to do this automatically. However, I think the way Inbox does it is great.

Additionally, Inbox makes it easy to see all of your reminders. I'm constantly using Google Now to set reminders. Prior to Inbox, it was somewhat cumbersome to see your reminders. Inbox has an option for that right in the navigation drawer for easy access.

Additionally, the ability to snooze email or pin it to the top so that you don't lose it in the inbox is helpful.

All in all, my preliminary thoughts on Inbox are that it I'm going to stop using the Gmail app and site altogether in favor of Inbox.

So, if you haven't done so yet, request an invite or get an invitation from someone who already has Inbox.