Tuesday, December 31, 2013

EVER WISH YOU COULD UN-SEND AN EMAIL? A RULE CAN HELP WITH THAT

We've all done it before. You hit the send button on an email and instantly realized you sent it to the wrong person, or you misspelled something, or you forgot to attach the attachment. Perhaps worst of all, you sent the email out of feelings of frustration or anger and realized too late that sending it wasn't such a good idea.

Once the send button is pressed, it is difficult to impossible to get it back from the receiver. However, you can set up Outlook to not instantly send your emails once you hit the send button. I have mine set to delay sending the email by one minute. It might not seem like a lot, but it is enough time for you to double check your email if you want before it is actually sent out. In an average week, I probably change three of four emails after I have initially hit the send button because of this.

To delay sending emails like this, you need to create a rule. Open Outlook and click on the File tab in the ribbon. Then, choose "Manage Rules & Alerts" in the Info area. In the window that pops up, click on "New Rule" near the top, which will open a new window.

Now, we are going to create a rule that applies to every email sent, so click on "Apply rule on messages I send" and choose next.


In the next window you can narrow down the application of the rule to only certain situations if you like. However, I prefer to have it delay all of my emails, so you can just click next. A pop up will remind you that your new rule will apply to all emails, which is what you want.

In the next window, check the box next to "defer delivery by a number of minutes". Then, in the lower window, click on the link "a number of minutes" and tell it how many minutes you want things delayed by. I chose one, but you can choose however many you like.


In the next window, you can choose situations in which you don't want to delay sending an email. There may be some situations where this makes sense for, but for me, I like having an across the board rule, so I just clicked next. In the last window, give the rule a name and make sure the box next to "Turn on this rule" is checked. Then hit finish.

From now on, when you hit the send button on an email, it will sit in your outbox for the number of minutes you set out in the rule before it is actually sent. Thus, giving you time to either edit the email, add the attachment you forgot, or to decide not to send it after all.

So, even if you have hit the send button, you now have a chance to un-send that ill formed email.

Friday, December 27, 2013

ONE WAY TO HANDLE EMAILS WHEN CLOSING A FILE

At the end of a case, I often will have several emails between myself and either opposing counsel or my client. As I receive and send emails, I always move those emails into the client's folder in my email inbox so that they are all kept together. But when it comes time to close a case, I don't like having to keep that client's email folder in my inbox. If I did that, my inbox folder list would be too large to easily navigate.

I am left with a few options. I could print out a copy of all of those emails and put with the physical folder. This keeps true to the notion that we should treat email like letters. But, the wanton destruction of trees and the waste of physical space is more than I care for.

Since we have both Adobe Pro XI and Outlook 2010, I've been using the option of converting an entire email folder and its contents into a PDF portfolio. As long as you have Adobe Pro loaded, you should be able to right click on the email folder, and at the bottom of the pop-up menu, you will have an option called Convert "<folder name>" to Adobe PDF.

Click on this and tell it where you want the new PDF portfolio saved. It will then convert all of your emails to PDF documents and store them as a PDF portfolio. This allows you to still easily navigate all of your emails in PDF format. During the conversion process, everything is made word searchable, so you can still search through those emails. Additionally, it brings all of the attachments with it, so you can double click on an attachment and it will open. It still has the look and feel of reading your emails in Outlook, but they are now PDF documents ready for long term storage.

By converting everything in this manner, you will be able to keep an electronic copy of your emails in your now former clients electronic folder and not clogging up your email inbox.

Thursday, December 26, 2013

CREATING RULES IN OUTLOOK

Due to the holidays, I was out of the office for a bit, but I'm back now and anxious to get back to blogging.

A number of attorneys and firms use Microsoft Outlook as their email client. One of the features of Outlook is the ability to create a "rule" that tells Outlook what to do with your email when it arrives.

As an example, I am signed up to receive email from a number of different listservs, one of which is the Ohio Bar Association Daily Report. As you can guess, most are devoted to technology issues. All email from the listserv comes from the same address, regardless of who sends it. It would be helpful if all of those emails would automatically be put in the folder in which I keep those emails. I can then read them when I have time and they aren't clogging my inbox.

There are a number of ways to create rules, but for this post, we're going to assume you have no experience creating rules. Start by opening an email from the sender you want the rule to apply to. For our example, I would open one of the Ohio Bar Association Daily Reports. In the Message tab of the email's ribbon, there is the "move" group. And within it is a button called "Rules".


Click on Rules and choose "Always Move Messages From: <email address>". Note that <email address> will be filled in with the email address of the sender of the email you had opened. This will cause a new window to pop-up. In the new window, highlight the folder you want Outlook to put all new emails from this sender in. If you don't already have such a folder, you can create one by highlighting where you want the folder to be and clicking new.


When you choose OK, it will run the rule on your entire inbox, moving any email in your inbox from that address to the folder you chose. Then, when you receive new emails in the future, it will automatically move them to your folder, automatically sorting your email for you.

Friday, December 20, 2013

OPEN WORD DOCUMENTS WITHOUT RUNNING STARTUP MACROS

In our office, I have been creating a number of MS Word templates that run macros or other code as soon as they are opened. It could be code that the macro automatically adds our letterhead to the document or that it pulls up a user form that gets information from the place in the document.

People prefer to access these templates in different ways; they sometimes open the template and other times they add a new document based on the template. I have found that it is sometimes easier to code around people's preferences than to try to get them to change their preferences. As a result, I have the templates set up to run the code regardless of how they access the document.

The up side to this is that the end users have the code run regardless of how they enter the document. The down side is that it could make it harder to edit the template when changes need made. In fact, I thought I had created uneditable templates because no matter how the template was opened, it always created a new document and would not give me a chance to change the template. This, naturally, led to frantic Google searching.

The point of this story is to point out that you can open a template or other document without running any macros or code that are otherwise supposed to run at start. To do so, hold down the shift key while the document opens, and none of those codes will run.

Just hoping to help out others who may have a similar problem.

Wednesday, December 18, 2013

GET DYNAMIC EXHIBIT STAMPS FOR ADOBE PRO

As you move from a paper-bound practice to a paperless practice, the value of Adobe Pro increases. In a paperless or semi-paperless world, the ability to manipulate .pdf files is incredibly helpful. If you practice in federal court, at least in Ohio, the ability to create and manipulate .pdf files is essentially a requirement.

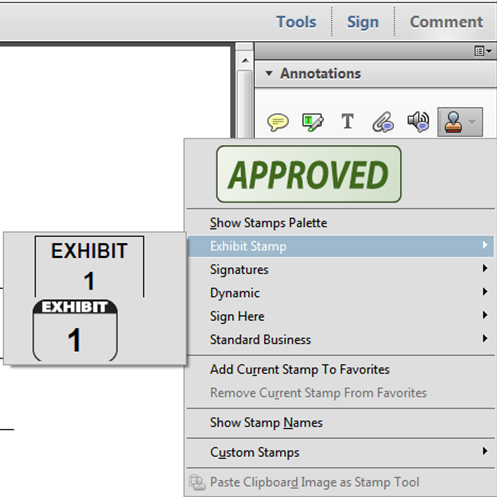
One of the missing features of Adobe Pro out of the box, at least from this attorney's perspective, is an exhibit stamp. Something that easily allows you to stamp a document as an exhibit to be attached to a pleading or motion that has the look and feel of a rubber exhibit stamp.

Fortunately, Rick Borstein at Acrolaw blog developed such a stamp. I would encourage everyone to read his post in full as it goes into detail about this stamp and how it works. You can download a copy of the file an installation instructions here.

The short version is that once you install it, it adds a new stamp to your stamp palette called Exhibit Stamp, which will contain two types of exhibit stamps.


When you click on your preferred stamp and place it in your document, a window will pop up that asks you what number, or letter, or text you want to place in the stamp.


Once you hit OK, you will now have a movable stamp with your own text in it that can be re-sized or re-positioned as you see fit.

When you are finished adding your stamps, you can flatten your document and the stamps will become a permanent part of the file.

So if you are regularly handling documents electronically, this offers a much cleaner and quicker solution than printing out the documents that need stamped, stamping them, and re-scanning them.

Tuesday, December 17, 2013

GOOGLE TIPS WILL SHOW YOU WHAT GOOGLE OFFERS

I'm a huge fan of Google and the Android operating system. I have played around with many of Google's apps and and regularly use a number of them. Yet, things change regularly and new features are added frequently and it is helpful to have a place to see what all Google currently offers.

Whether you are new to what Google offers or already know a lot about Google, it is worth checking out Google Tips. Here, both new and old users are likely to learn tips and tricks for how to get the most out of what Google offers.

h/t The Droid Lawyer

Monday, December 16, 2013

ASSIGN A KEYBOARD SHORTUCT TO A MACRO

In the last post, we talked about how to add a macro to the Quick Access Toolbar. For those that like to click, this is a good option. If you're like me, you would rather just type in a key combination and have your macro run automatically. Word 2010 makes this very easy to set up.

To do this, go to the File tab on the ribbon and choose option. From in the options, click on the "Customize Ribbon" option in the left column. Then, near the bottom, click on the "Customize" button after the words "Keyboard shortcuts:"


This will bring up the Customize Keyboard window.


Under the Categories list, scroll to the bottom and choose Macros. Then, under the Macros: list (it will pop up after choosing Macros in Categories) choose the macro you want to assign a shortcut key to. Click in the "Press new shortcut key:" box and type in the key combination you want to assign to run your chosen macro. Lastly, click the "Assign" button in the lower left of the window.

Now, whenever you are in Word and type in your shortcut combination you assigned, it will automatically run your macro. Some people will find this easier to use than either opening the macro window or clicking on a button in the Quick Access Toolbar.