Wednesday, January 28, 2015

The Beginner's Illustrated Guide to Tables of Authorities in Word

Okay, by now we all are aware that Microsoft Word can help manage the table of authorities in your brief. Yet, how many lawyers actually use this function let alone understand how it works? How many legal assistants understand it? How many times have you tried to use this function only to give up and go back to doing it by hand and hoping it all worked out well?

I understand. I don't think it is a well-documented feature. Yet, once you know how to use it, you will not go back to doing it by hand. 

So, let’s dig into an image intensive look at how to actually let Word create the table of authorities for you. This will be a lengthy post, but I think seeing screen shots of what to do will make it easier to figure out what to do.

First, write your brief. Do not, I repeat, DO NOT, try to mark your authorities as you write. It will make your life more complicated. I typically mark my cases for inclusion in the table of authorities when the text of the brief is finished and I’m cleaning up all of my citations. I might make some minor edits, add a paragraph here or there after I do this, but I’m not adjusting the order of citations.

Once you brief is finished, start at the top of your brief and find the first citation. Highlight the entire citation. Go to the References tab on the ribbon and click on “Mark citation”.


 This will bring up a new window. The first citation in your brief will of course be a full or long citation, and it might even have a pinpoint to the page number in the reporter. In the “Selected Text” box will be the citation you had highlighted. Edit the text in this box to be what you want to show up on the table of authorities. For example, I would remove the pinpoint citation in this example.


On this screen, you will also need to ensure that you have the correct category selected for this citation. Since this is a case, I have selected Cases. Ignore the other areas of this window for now and choose the “Mark” button.

After you click “Mark”, you will be taken back to your document. 


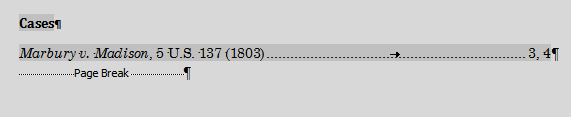
If you weren’t showing paragraphs marks (you didn’t have the pilcrow selected on the Home tab) you may be surprised to see a completely different looking document. It will look something like the below. Of note, the highlighted information is the information added, but don’t worry, it won’t show up when you print. Unless you know what you’re doing, DO NOT EDIT THE ADDED INFORMATION. Editing it will affect how your table of authorities is built.

Repeat this process for every new citation you come across. Of course, eventually, you will come across a short citation or an id. citation. In that case, you will highlight the short citation and choose mark citation as before.
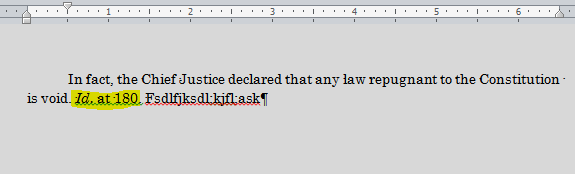


This time, when the window pops up, simply click the case name in the short citation list that the citation you are adding points to.


 So, in my example, I’ve highlight an Id. in my document, but it points to the Marbury case, so I choose Marbury from the short citation list. If the short citation is not a case but a statute, make sure you look in the correct category. Once highlighted, choose Mark.

Once all of your citations are marked as set out above, go to the point in your brief where you want to insert a table of authorities. Put the cursor on that spot. Then, go to the References Tab on the ribbon and choose “Insert Table of Authorities”.


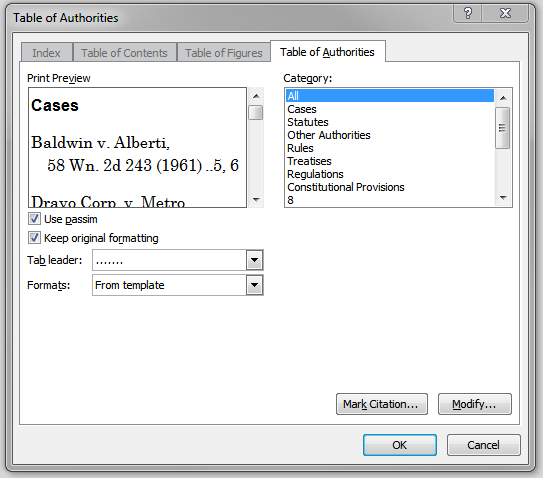
 This will pull up a new window. You can modify how your table will look in this window. 


For now, we’re just going to insert the table. So, make sure you have “All” selected under categories. If you only wanted to insert some of the categories, you could do that here. Note, it will only insert categories that actually have items in them. So, if you have no Rules, it won’t display an empty Rules area. Next, choose “OK”.

And, as you can see, you now have a wonderful looking Table of Authorities. 


Now, let’s say you have added other pages or moved some items around. No problem. Prior to finalizing your brief for printing and saving, turn off the option to show formatting (again, the pilcrow on the home page). Next, right click on your table of authorities and choose “update field”.


 In my example, I added a whole new page. As you can see, this automatically updates all of the page numbers.


It is important that you not be showing formatting marks when you do this. I’ve found that the length of the information added by mark items for the table can do weird things to the page numbering IF you have it showing when updating fields. So, if your page numbers seem off, that may be why.


That’s it. It really isn’t that hard. And the time and headache it can save with manually checking the page numbers and updating it when you make little edits more than make up for the time it takes to actually follow this process.

Tuesday, January 20, 2015

Feeling a Lack of Ambition? Hang Out with Some Legal Tech Folks

With the ending of the holiday season and all of the spectacle and business that comes with it, I was feeling somewhat exhausted and burnt out. My ambition for taking on new projects and learning new stuff was low. Fortunately, that all changed last week.

Last week, I had the opportunity to attend and present at the Legal Services Corporation's Technology Innovation Grant annual conference in San Antonio. The conference brought together advocates and legal tech types from across the county to talk about how to better use legal technology to help not only legal attorneys but their clients and the thousands of people across the country who can't afford an attorney and that a legal aid program is unable to assist.

Hanging out with that crowd, picking their brain, and listening to their ideas was just what the doctor ordered. The amount of enthusiasm, creative thinking, and energy was infectious. Ordinarily, I find conferences and social events to be draining. While I was physically exhausted after 2 1/2 intensive days or tech, I left San Antonio with more mental energy than I've felt in several months.

So, if you're feeling a lack of ambition, find a group of legal techies and hang out with them. Ask them what new project or thing has them excited. I don't think it is possible to come away not feeling refreshed and ready to take on the world.

Monday, January 5, 2015

Tips From Legal Office Guru on Tables of Authority

Hope everyone had a merry Christmas and Happy New Years and all of that. I know I enjoyed a couple weeks away from the office and mostly disconnected. However, now it's time to get back, and I'm looking froward to a new year of blogging.

To get the new year started, I wanted to point out a great post over at Legal Office Guru that discusses common errors in creating tables of authority in Microsoft Word. I'll admit that I've learned the hard way why this article hits the nail on the head.

I hope to have a post up this week doing a walk-through on how to do it right.

Friday, December 19, 2014

Universal Copy and Paste with Pushbullet

I've mentioned my fondness for Pushbullet in the past. You can easily send links to websites from one device to another, as well as receive notifications from your phone on your desktop. You can even send SMS messages from your desktop.

One of the features I've been using more and more lately is the ability to copy and paste text from one device to another. For example, suppose I'm working on something on my tablet and need to insert a block of text that is on my computer. With Pushbullet's universal copy and paste, I can highlight and copy the text on my desktop. Then, after waiting a second or two, on my tablet, I simply choose paste where I want the text I copied on my desktop to go.

To enable this, on all of your devices you want to be able to do this, simply open up Pushbullet's options and enable Universal Copy and Paste.

Wednesday, December 17, 2014

Tasker for Attorneys: Have Your Android Wear Watch Find Your Misplaced Phone

When I have my Galaxy Gear Live connected to my phone, it automatically turns the volume and vibration off on the phone. Of course, if I then misplace my phone under a pile of papers in the office, I can't find my phone. With the volume down, I can't just call it. How can I find it quickly and easily?

Fortunately, Tasker can come to the rescue.

First, get Tasker. Yes, it is a paid app. But it is worth the price of admission for the control and automation it can bring. To increase the usability with your Android Wear Watch, get WearTasker as well.

In Tasker, the first order of business is to create a variable. On the Tasker home page, go to the VARS tab. Add a new variable and call it %FOUNDPHONE.

Next, create a new task and call it “Kill Ringer”. The only action that we’ll add to this task is to set a variable. So, add a new action, choose the “Variables” action category, and choose variable set. The name will be %PHONEFOUND. Set it to 2. Save this task.

Next, in Tasker, go to the TASKS tab and create another new task. Give it a name you find useful.

In your new task, add an action. Choose the Variables action category. Then choose Variable Set. The name of the variable to set is %FOUNDPHONE. Set it to 1.

The next action to add is to increase your phone's volume. Select the Audio action category, and choose ringer volume. Set the volume to 7 or higher so that it will ring loudly.

Now, add another action. Choose the “Media” action category. In there, choose “Play Ringtone”. The type should be “ringer” and stream should be “Alarm”. Under if, the first box should be %FOUNDPHONE, the sign should be equals, and the third box should be 1. This step is important. If you don’t set the ringtone to only play when the variable = 1, then it might ring in an unceasing loop. That would be annoying, to say the least.

The next action we’ll add is a pop up. This way, when you find your phone, you’ll be able to easily quiet the ringer. Add a new action, choose the “Alert” action category, and then choose “Popup Task Buttons”. Under the Text, put in something like “Found my phone”. For mode, choose text. For task, you’ll put in Kill Ringer. Lastly, set the Timeout (Seconds) slider to 60.

What this does is create a popup on your phone with a button that says “Kill Ringer”. When you push the button, it runs the first task we created, which sets the %PHONEFOUND variable to 2, which stops the ringer. Also, the popup will disappear after 60 seconds.

The last task we want to add is to again set the %PHONEFOUND variable. This time, set it to 2. This way, if the previous popup disappears due to the timeout, your phone will stop ringing.

Now, leave Tasker and go to WearTasker. Click the floating action button at the bottom and choose “Add task”. The task to add will be the one we just finished creating in Tasker. Save and exit.
WearTasker will update your watch with this task. When you open WearTasker on your watch, it will have a button with the name of your task. Pressing it will run the task, increasing your phone’s volume and causing it to ring.


Now, when you misplace your phone in your office with the volume low, you’ll be able to quickly and easily find it.

Monday, December 8, 2014

How to Add Bates Stamps using Acrobat Pro

Whether dealing with vast quantities or even a few dozen discovery documents, organization is critical. Bates Stamping documents makes staying organized much easier. However, if you have Acrobat Pro and are still using an actual Bates stamp or machine, you're making life much too difficult.

For those unfamiliar with Bates stamping, it is a system of putting a prefix and incremental number on the bottom right corner of every page. For example, if I received 100 documents from Plaintiff Smith, I might put SMITH 00001 on the first page, SMITH 00002 on the next, and so forth. Physically stamping this way used to be the practice, and I'm sure some still do that.

But, let me show you how I do it.

First, if you haven't already done so, scan all of your documents into a .pdf file. Save the file. I typically will give it a useful name and then add the word "clean" to the end. This tells me that this is my original, unnumbered set of documents. I then make a copy of the file and add the word "bates" to the end. This is the document I'll number. It is also the document I'll be using from here on.

Open that file in Acrobat Pro. From there, on the right side drawer, go to "Tools" -> "Pages" -> "Bates Numbering". Choose to add bates numbers.

This will pop up a new window. Choose to Add documents and select add open files:


Choose the open file you want, then select Ok. Hit Ok again and you will see a new window open up:


Put the cursor in the "Right Footer Text Box" and then click the "Insert Bates Number" button. In the new window, put in the prefix you want to use remembering to put a single space at the end. You can adjust the starting number and number of leading zeroes if you like. Select Ok and then Ok again.You now have a Bates numbered document, which will help with organization.

Monday, December 1, 2014

Use Tab Stops to Line Up Words in Microsoft Word

I've talked in the past about the importance of using the left indent instead of the space bar when adjusting where to start text on the page. This addresses how to align the left margin of blocks of text. But, what about aligning items in the middle of a sentence?

For example, let's look at the top of an affidavit in common use in Ohio:

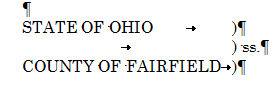
The goal here is to align the closing parentheses vertically. I've received a number of documents from colleagues where they are almost aligned, but not quite:


The reason for the misalignment is simple. The drafter used the space bar to try to line everything up:


There are a number of problems with this method. First, it will rarely result in having everything lined up vertically unless you are using a monospaced font.  As Butterick says in Typography for Lawyers, "There are no good reasons to use monospaced fonts. So don't."

Second, fixing typos can be a pain. If you notice you made a mistake with the space bar method, you will likely have to go back and fix all of those spaces again, which can be a headache.

Lastly, it is time consuming. You end up spending a good deal of time trying to get the alignment close only to end up with imperfect results.

Instead of using the space bar, set tab stops. Here's how I would create the alignment. 

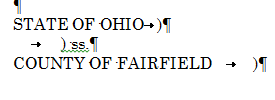
First, type in your text and insert a single tab between the last word and the closing parentheses. So, when you're done, you'll have something that looks like this:


Those arrows pointing to the right indicate the press of the tab key. So, how does this help us? Now, when you adjust the tab stop, it will align those parentheses. To do this, highlight all three lines. Then, click on the top ruler to insert a tab stop where you want the parentheses to line up:

This will add a tab stop on your ruler, which I have circled above. Now, your parentheses will all be perfectly aligned. 


If you need to edit the location of the parentheses at any point, simply highlight all three lines and click and drag the tab stop in the ruler to the new location. 

Using this method will save you time and headache and result in a better end product than using the space bar.