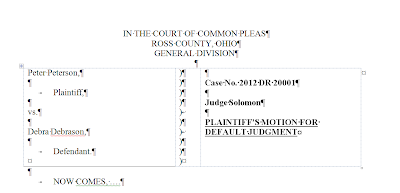
While they might look similar when printed, using the bottom version will make your life much simpler in terms of editing. To understand, let's click the pilcrow button we discussed earlier and see how each was constructed:
In the top version, you can see that the entire caption was made by just using the tab key to line everything up. Sure, it looks fine when printed, but if you ever want to change the caption, for example, by adjusting the name of the pleading, you run the risk of throwing the entire thing out of alignment. And if you don't have the symbols turned on, it might take a little bit of time to figure this out.
By contrast, I recommend using the technique in the bottom version. As you can see, it uses a table with three columns and one row. There are no borders in any of the cells except the left cell, which has the bottom border turned on. By using the table, you can adjust things in any of the three cells, and it won't alter your formatting in the other two. Let's say you need to give the pleading a name that is four lines long instead of two. Using the table, you won't have to adjust the names of the parties like you would if you didn't use a table.
Tables, like other Word functions, are underutilized in my experience even though they can make it much easier to format legal writing.


Office 2013: Keyboard shortcuts for Microsoft Word
ReplyDeleteWhen I put in 3 columns, it will not allow me to change column 1 to be wide enough to fit my caption. How do I make column one wider than 2.33 inches?
ReplyDeleteI read that Post and got it fine and informative. Click Here
ReplyDelete