Okay, by now we all are aware that
Microsoft Word can help manage the table of authorities in your brief. Yet, how many lawyers actually use this function let alone understand how it works?
How many legal assistants understand it? How many times have you tried to use
this function only to give up and go back to doing it by hand and hoping it all
worked out well?
I understand. I don't think it is a well-documented feature. Yet, once you know how to use it, you will not go back to doing it by hand.
So, let’s dig into an image intensive look at how to
actually let Word create the table of authorities for you. This will be a lengthy post, but I think seeing screen shots of
what to do will make it easier to figure out what to do.
First, write your brief. Do not, I repeat, DO NOT, try to
mark your authorities as you write. It will make your life more complicated. I
typically mark my cases for inclusion in the table of authorities when the text
of the brief is finished and I’m cleaning up all of my citations. I might make
some minor edits, add a paragraph here or there after I do this, but I’m not
adjusting the order of citations.
Once you brief is finished, start at the top of your brief and
find the first citation. Highlight the entire citation. Go to the References
tab on the ribbon and click on “Mark citation”.
On this screen, you will also need to ensure that you have
the correct category selected for this citation. Since this is a case, I have
selected Cases. Ignore the other areas of this window for now and choose the “Mark”
button.
After you click “Mark”, you will be taken back to your
document.
If you weren’t showing paragraphs marks (you didn’t have the pilcrow
selected on the Home tab) you may be surprised to see a completely different
looking document. It will look something like the below. Of note, the highlighted
information is the information added, but don’t worry, it won’t show up when
you print. Unless you know what you’re doing, DO NOT EDIT THE ADDED
INFORMATION. Editing it will affect how your table of authorities is built.
Repeat this process for every new citation you come across.
Of course, eventually, you will come across a short citation or an id.
citation. In that case, you will highlight the short citation and choose mark
citation as before.
This time, when the window pops up, simply click the case
name in the short citation list that the citation you are adding points to.
So,
in my example, I’ve highlight an Id. in my document, but it points to the
Marbury case, so I choose Marbury from the short citation list. If the short
citation is not a case but a statute, make sure you look in the correct
category. Once highlighted, choose Mark.
Once all of your citations are marked as set out above, go
to the point in your brief where you want to insert a table of authorities. Put
the cursor on that spot. Then, go to the References Tab on the ribbon and
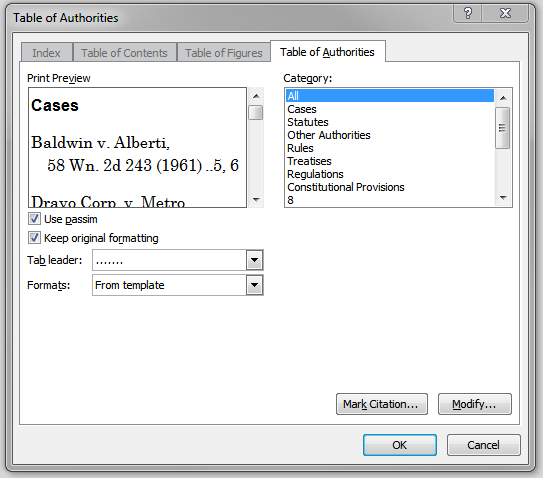
choose “Insert Table of Authorities”.
For now, we’re just going to insert the table.
So, make sure you have “All” selected under categories. If you only wanted to
insert some of the categories, you could do that here. Note, it will only insert
categories that actually have items in them. So, if you have no Rules, it won’t
display an empty Rules area. Next, choose “OK”.
And, as you can see, you now have a wonderful looking Table
of Authorities.
Now, let’s say you have added other pages or moved some items
around. No problem. Prior to finalizing your brief for printing and saving,
turn off the option to show formatting (again, the pilcrow on the home page).
Next, right click on your table of authorities and choose “update field”.
It is important that you
not be showing formatting marks when you do this. I’ve found that the length of
the information added by mark items for the table can do weird things to the
page numbering IF you have it showing when updating fields. So, if your page
numbers seem off, that may be why.
That’s it. It really isn’t that hard. And the time and
headache it can save with manually checking the page numbers and updating it
when you make little edits more than make up for the time it takes to actually
follow this process.


No comments:
Post a Comment