Monday, August 29, 2016

If You're Not Using Quick Parts and Auto Texts, You're Wasting Time and Money

It's an old adage that, as attorneys, our stock in trade is our time and advice. Accordingly, wasting time on technology is not only wasting time, it is wasting money and resources. If you have technology in front of you that can save you time and you don't use it, then you are wasting your time. Quick parts in Microsoft Word is one of those technologies that not everyone is aware of that is sitting right in front of them. So let's learn a little bit about quick parts.

First, in Office 2016, it feels like they have made quick parts and auto text harder to find. If you go to the Insert tab on the ribbon, you'll find them under the text group. If you have too many items on the ribbon or less screen real estate you might only see the icon. I've circled what you're looking for in this picture:


As you can see, if only the icon is displaying, you have to already know about quick parts to find it. At least, that's how it seems to me. Here's a better picture of just the icon you need:


Now that you've located it, what do you do with it? If this is the first time you've even looked at that icon, there's not much to do.

Yet.

While Microsoft does some fantastic work and there's a reason that its suite of office products is basically the standard everywhere, it hasn't yet figured out how to read your mind. It doesn't even use the type of machine learning that can pay attention and figure out how it can save your time. Instead, we still have to tell Word what can save us time.

Let's start with something simple. Something we lawyers probably use on a regular basis: a pleadings signature block. Including formatting and margin settings and tab stops, here's what mine looks like:


As you can see, there is some special stuff going on here that a simple auto correct is not going to be able to cover. It uses a specific single spaced style. The left margin is set to slightly less than 4 inches, and I use a custom tab stop to line up my phone, fax, and email. Doing all of this from scratch every time is tedious at best, likely to produce the occasional typo, and a waste of time. You could keep a master signature block somewhere I suppose and copy and paste from it, but even that's tedious to me.

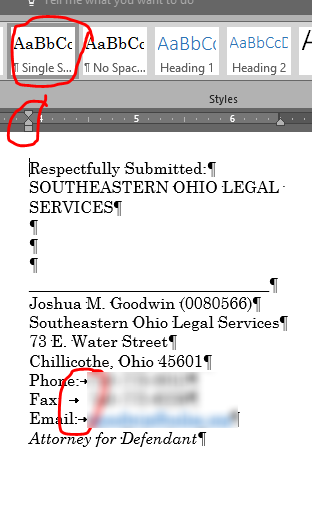
This is where quick parts and auto text shine. On my system, I have this set as an auto text. This way, when I start typing "respectfully submitted", Word asks if I want to insert my signature block:


Isn't that helpful? Now, anytime I want to put in my signature block, I just start typing it and Word asks if it can do all the hard work for me. If only everything in life worked this way; I get out the cutting board and my kitchen asks "Can I go ahead and instantly make your favorite meal, a nice paneer curry with naan and jasmine rice? It will be exactly the way you like it, of course."

Of course, this culinary example illustrates a potential problem with using auto texts. What if I didn't want curry but was getting out the cutting board to chop up a carrot for my kids? I could ignore the prompt and just keep going. But what if I wanted to type respectfully and hit enter. If I do that, it will assume I want my signature block.

This is the potential problem with auto text: it can make assumptions you don't want it to make. So you either have to use specific names that are unlikely to have you pressing ENTER afterwards, or you need to use a different method. Fortunately, Word provides that different method with quick parts.

Quick parts functions similarly to auto text in that both insert blocks of formatted text. But the way you access them is different. Auto texts appear when you start typing the name you've given the auto text. Quick parts do not. Instead, with quick parts you start typing the name of the quick part and hit F3. OR, you click on the quick parts icon and choose the block of text you want.

With quick parts, your quick parts show up immediately in the quick parts icon. Auto texts do not show up like this, which can make them a touch slower to access if you don't remember what you named the auto text.

Now for the part you've probably been waiting on: How do I actually make the darn things? It's surprisingly easy.

First, type and format the text you want turned into a quick part.

Second highlight that text.

Third, click on the quick parts icon. In the menu that comes up, if you want to save the item as a quick part, choose the "Save Selection to Quick Part Gallery..." option. If you wish to save it as an auto text, choose Auto Text and then select the "Save Selection to Auto Text Gallery..." option.

It will then open a window that looks like this:


By default, it will suggest a name that is the first couple words of your selection. You can change this to whatever you want. The name you give it though is going to be what you type in your document to get it to automatically add the auto text or quick part text. You can then select whether you want to save it as a quick part or auto text. You can categorize your selections (perhaps signature lines, discovery, pleadings, etc.). Lastly (at least as far as this post is concerned) you can choose whether to save this in your normal.dotm file or another setting. I almost always choose normal,dotm so it is available regardless of what document I'm typing in.

Click on OK, and you now have your quick part or auto text ready to use.

I do not recommend going out and setting up a bunch of these in a rush just to get started. Instead, be conscious of what you're typing for a week. If you find yourself typing the same thing a couple of times in a row, then go ahead and add it. If you try to think of everything in advance, odds are you will forget what you named your quick part and will forget to use it.

So, get out there and start saving yourself some time and stop wasting resources on typing the same thing for the 100th time this month.

Sunday, August 28, 2016

Change Computers Without Losing Your Word Settings

In our office, we recently upgraded our computers to Windows 10 and jumped from Office 2010 to Office 2016 and Office 365. The new computers now have solid state drives (which are crazy fast) and I couldn't be happier.

One of the things I'm happiest about is that even though I got a new computer and the latest version of Microsoft Office, I didn't have to start over with a blank copy of Word. I was able to transfer all of my quick parts, auto corrects, ribbon settings, and macros from my old computer to my new computer. The best part, it wasn't too hard to do.

First, let's get all of our ribbon and quick access toolbar customizations from the old computer. In Word, go to File => Options => Customize Ribbon. In the box that pops up, you'll choose the drop-down in the lower right labeled Import/Export, which is circled below. Then, choose Export All Customizations.


Save this file on a flash drive or in some other location that you can access on your new computer. Then, on the new computer, open Word and go to File => Options => Customize Ribbon. Again choose the Import/Export drop-down circled in the picture above and this time choose Import Customizations. Select the file you saved in the previous step and you will now have the same ribbon and quick access toolbar setup as on the old computer.

Of course, you will also want to bring over your Normal.dotm file from the old computer. This is where you basic page setups reside, including your default styles and your macros. To do this, open your file explorer and navigate to the following path: C:\Users\[user name]\AppData\Roaming\Microsoft\Templates. Obviously, you'll replace [user name] with the user name for your computer.

One important note, if you navigate to your user name and don't see a folder labeled AppData, it simply means that you are not currently viewing hidden folders. The AppData folder is hidden by default to prevent accidentally changing it's contents. To view it, navigate to the Users\[user name] folder. Then, go to the View tab on the ribbon and check the Hidden Items box:


Once you get to the Templates folder, you'll need to copy the Normal,dotm file. Then, on the new computer, navigate to the same folder and replace the Normal.dotm file on the new computer with the one from the old computer.

Next, you will want to copy all of your quick parts and other building blocks from the old computer. This time, on the old computer you'll navigate to C:\Users\[user name]\AppData\Roaming\Microsoft\Document Building Blocks\1033\16. That last number could be 10 or another number depending on which version of Word you are using. In this folder, you'll need to copy the Building Blocks.dot and the Built-In Building Blocks.dot files to take them to the new computer. Again, on the new computer, navigate to the same folder and paste in the files you just copied.

Lastly, let's copy over your auto-corrects. On the old computer, navigate to the following folder:  C:\Users\[user name]\AppData\Roaming\Microsoft\Office. In that folder, look for all the files named MSOXXXX.acl. The X's will be numbers. Copy all of the files that match that description and transfer them to the same folder on the new computer.

By following these steps, your new version of Microsoft Word on your new computer will be just like your old version, which will let you get up and running fast.

Saturday, August 27, 2016

Glad To Be Back

It's been a little more than a year since my last post. It's a bit of an understatement to say that my life has been a bit busy during that time. While I'm not going to go into the details, I've not had time to devote to this blog. While life's still crazy both in and out of the office, there have been a number of things I've wanted to blog about in terms of legal technology, and so, I'm going to try to post here more frequently.

As a preview, over the next week or two, I'll be posting about how to keep your Word settings when changing computers, using styles, using quickparts and auto-text, and the intersection of management and technology.

Stay tuned, I hope to have more coming soon.