Since becoming the managing attorney in my local legal services office, I've found less and less time to devote to things like blogging. Now that I'm in the swing of things, I hope to be able to get back to it more.
Our legal services office covers seven counties in rural Southeastern Ohio. If the area covered by our office were a state, it would be the 48th largest. As a result, I'm on the road. A lot. And I don't want to carry a scanner around with me everywhere I go. So, I started looking for a free scanner app for my phone.
My choice: Microsoft's Office Lens. It allows you to take a picture of the document you want to scan and automatically straightens and crops it. It let's you save it to your OneDrive account as either a pdf file or word document. Moreover, if you choose to save it as a word document, it is automatically editable.
I have not had a chance to use it a lot, but what I've seen so far I like. And at free, it is a good price. I suggest giving it a try.

A blawg devoted to providing practical tech tips to lawyers
Tuesday, July 28, 2015
Friday, June 12, 2015
Quick Parts in Word - USE THEM!
For those Microsoft Office 2003 power users out there, you might know everything there is about Word 2003, but the Ribbon in 2007 and later frustrated you. If, like me, you resisted the change to 2007 or later, you might not have taken the time to learn all the advances in 2007 and later versions. Instead, you relied on macros and auto-correct to do most of your work.
If that's the case, you might be entirely unaware of Quick Parts. Quick Parts allow you to enter large blocks of text with formatting in a matter of a few clicks. Even better, it is incredibly easy to create Quick Parts; they are much easier than macros and auto-correct.
If you haven't done so, I highly recommend that you make them a regular part of your practice. Create Quick Parts for your signature block, court captions, your standard deposition notice language, your standard notice of appearance language, all of those stock objections you raise on every response to a request for production. And the list just goes on.
To learn more about them, I recommend checking out this article from the ABA.
Friday, April 17, 2015
Thursday, April 16, 2015
Google Handwriting Input - Neat, But Not For My Phone
If you use an Android device and are not following The Droid Lawyer, you're really missing out. Jeffrey Taylor always keeps you up to date on using Android in the practice of law. Today's post talked about Google Handwriting Input, which allows you to write instead of typing.
I've only had it on my phone for today, and I must say, I loved it. At first at least. I think that part of it was some nostalgia for my old palm pilot I had in college with its stylus and writing that way. However, on my phone, I think that using the keyboard is still quicker. I will say the handwriting recognition was much more accurate than I would have predicted. There just isn't enough room to get into a flow. And the ability to slide from letter to letter on the keyboard just feels easier. Maybe practice with the handwriting feature would change that, but I'm not sure I've got the patience now to find that out.
I hope to add it to the tablet and see how it works there. The extra room might be a key difference. For now though, as fun as it was to think back on my time at Ohio State, I think I'll be staying with my keyboard. I would encourage everyone to give it a try, because for some, it might be the way to go.
Friday, March 20, 2015
An Easier Way to Find Your Phone using Your Android Wear Device
In the past, I explained a method of ringing your phone using from your Smartwatch using Tasker.
Yesterday, Google made my whole post obsolete. And I couldn't be happier.
Now, you can tell your watch to your phone without using Tasker. According to Google, all you have to do is say "Ok Google. Start. Find my phone". Personally, this did not work for me. It instead brought up the option of opening the Google blog post I described above.
Instead, I use "Ok Google. Start app find my phone", and it seems to work nearly every time. Of course, if you're using Android Wear Mini Launcher, you can just swipe right across the top of the watch one time and find the "Find my phone" app directly.
Launching the app will cause your phone to ring at full volume. Assuming your phone is close enough to be connected to your watch, this is an incredibly easy way to find it. Especially useful for finding that phone buried under the mountain of paperwork on your desk.
Monday, March 9, 2015
Plan For the Loss of a Mobile Device Now
I spent a couple of days last week in New York talking with some very smart people about automated document production in the legal profession geared primarily towards pro se individuals and legal services advocates. On the way back to Ohio, I had a layover in D.C. During the flight from LaGuardia to D.C., I took a nap. I placed my tablet in the seat back pocket. Upon waking, I completely forgot that I had done this and left the plane without picking up my tablet.
It wasn't until half an hour later as I was waiting at the next gate that I realized what had happened. Fortunately, I was lucky and was able to get it back without too many problems. But, as I stood there waiting for an answer as to whether my device had been located, I began to think about what to do in the event that my device was lost. It wasn't something I had put much thought in to before. After all, I've lost more wedding rings than mobile devices (true fact).
Today's message: don't wait to think about what to do if you've lost your device. Some things to think about would include ways to locate it using GPS. Perhaps a message on the lock screen containing information about what a good Samaritan can do to return the phone. And, of course, ways to completely wipe all information from the device remotely if it isn't found and returned. This is especially important if it is a device that contains confidential information.
This latter point is worth thinking about a bit. I've pulled that trigger one time just to see how thorough a remote wipe was. It was very, very thorough. Nothing left. I had backed everything up ahead of time because I knew in advance what I was going to do. Odds are, that won't be an option if you've misplaced your phone. So, if you haven't got a backup plan you're following, probably a good time to think about that as well.
Wednesday, February 25, 2015
A Pictorial Guide to Signing PDFs On Your Android Device
You get an email with a .pdf document attached. You're on the road and check it on your phone. Everything is in order, it just needs your signature. You despair because there's no easy way to print it from your phone, sign it, scan it, and send it back. Sure, if you're lucky enough to have Adobe Pro back at the office, you could handle it on your desktop. But, that's far away from where you are now. What to do?
Fortunately, the Adobe Reader app for Android phones (maybe for iPhones, but I don't know since I'm Android all the way) makes this exact scenario a thing of the past. With the Adobe Reader, you can sign your .pdf documents easily and free of charge from your Android powered devices. Today, I'm going to walk you through how to do that.
First, make sure you have the Adobe Reader app on your device. Then, open up your .pdf file in Adobe.

Now, tap in the middle of your document, which will change the bar at the top to look like the following:

Choose the pen (the last tool on the right), and you'll receive a toast message telling you to tap on the screen at the location you want to insert your signature. I'd choose right on the signature line.

Once you've tapped where you want your signature to go, you'll be taken to a screen where you will be asked to sign your name. Simply do that. Sign your name. You can modify the look of it with the controls at the top. When you're done, tap the check mark.

After a brief dialog asking you to give your signature a name, you will be taken back to your document, but it will have your signature added in now on the signature line.


So, why would you ever use this? Well, for starters, it eliminates the scenario described at the top. IT saves trees. Moreover, if you have a document you want a client to sign, you can have them just sign your phone.
Fortunately, the Adobe Reader app for Android phones (maybe for iPhones, but I don't know since I'm Android all the way) makes this exact scenario a thing of the past. With the Adobe Reader, you can sign your .pdf documents easily and free of charge from your Android powered devices. Today, I'm going to walk you through how to do that.
First, make sure you have the Adobe Reader app on your device. Then, open up your .pdf file in Adobe.
Now, tap in the middle of your document, which will change the bar at the top to look like the following:
Choose the pen (the last tool on the right), and you'll receive a toast message telling you to tap on the screen at the location you want to insert your signature. I'd choose right on the signature line.
Once you've tapped where you want your signature to go, you'll be taken to a screen where you will be asked to sign your name. Simply do that. Sign your name. You can modify the look of it with the controls at the top. When you're done, tap the check mark.
After a brief dialog asking you to give your signature a name, you will be taken back to your document, but it will have your signature added in now on the signature line.
If you want to modify your signature's appearance on the page, simply tap on it. You will be given options to modify how it looks as well as to re-size it and move it to a different place on the screen.
You now have a saved document with your signature on it, ready to return by email, print, or whatever else you want to do with it. Even better, when you go to sign something else, it will remember your signature and give you the option of simply inserting it.
So, why would you ever use this? Well, for starters, it eliminates the scenario described at the top. IT saves trees. Moreover, if you have a document you want a client to sign, you can have them just sign your phone.
Friday, February 20, 2015
Not Every New Feature is Immediately Useful, but That Doesn't Mean It Should Be Dismissed as Frivolous
I read this article on LifeHacker this morning about how you can turn on your phone's flashlight using by telling Google to turn on the flashlight. Still not quicker than just hitting the flashlight button on the phone in my opinion. Same with toggling WiFi and Bluetooth.
I had this same reaction back when I looked at the Commandr app. I just don't see this new feature as being at all useful or important.
However, after giving it a little more thought, that's not at all fair. Commandr and the deserved accolades it got made it clear that there was interest in voice functionality. This new step from Google is pushing the ball forward. Yeah, the current iteration of what it does might not be all that impressive, but that doesn't mean the next step won't be.
My point: just because the newest feature or idea seems frivolous to you, that doesn't mean it won't be the genesis of the feature you're using everyday six months from now.
Thursday, February 19, 2015
Got an Android Phone? Get Lollipop As Soon as Possible
I have a Samsung Galaxy S4. It's my first Samsung phone, and it hasn't been bad. I'm not a fan of the TouchWiz overlay that Samsung puts on top of the Android operating system, but it has served me well. However, I've been waiting patiently for a few months now to get the update to Lollipop and it still hasn't come. So, rather than continue to wait, I decided to install a development version of a custom ROM called CyanogenMod. In all honesty, it was the best decision I think I've made so far in 2015.
CyanogenMod is pretty close to being the stock Lollipop experience. No TouchWiz, no bloatware, no middle layers between you and the operating system. It is wonderful.
So, why is is so much better. I'd be lying if I didn't admit that it just looks better. It really, really does. I'm not one who gets caught up in form; I want functionality. But the look of Lollipop is simply wonderful.
The real benefits though do come in function. For example, the built in ability to have trusted devices and trusted locations. If my watch is connected, it knows that I must nearby and so unlocks my phone so that I don't have to put in my pattern lock. If I'm at the house, it knows it, and I don't have to put in my pattern. This feature alone has made my wife somewhat jealous.
Additionally, the way notifications pop up on the screen at the top when you are in other apps. They poke down, let you see what is going on, but without being intrusive.
Multiple profiles are available if you're sharing the phone with others or want different setups (work and personal).
Battery life is better than what it was prior to switching to CyanogenMod.
Now, the recent apps feature shows your Chrome tabs mixed inn with recent apps, a huge plus for me.
The status bar and navigation drawer are even more useful.
The change from KitKat to Lollipop was one of the biggest changes I recall seeing on my phone. It's wonderful.
So, if you're anxious, give CyanogenMod 12 a try. For the Galaxy S4, their nightly builds are good enough to be your daily workhorse. At least they are for me, and I feel like I ask a lot of my phone. Yeah, it will void your warranty and all that business, but, it is completely worth it in my opinion. Lollipop really is that good.
Wednesday, January 28, 2015
The Beginner's Illustrated Guide to Tables of Authorities in Word
Okay, by now we all are aware that
Microsoft Word can help manage the table of authorities in your brief. Yet, how many lawyers actually use this function let alone understand how it works?
How many legal assistants understand it? How many times have you tried to use
this function only to give up and go back to doing it by hand and hoping it all
worked out well?
I understand. I don't think it is a well-documented feature. Yet, once you know how to use it, you will not go back to doing it by hand.
So, let’s dig into an image intensive look at how to
actually let Word create the table of authorities for you. This will be a lengthy post, but I think seeing screen shots of
what to do will make it easier to figure out what to do.
First, write your brief. Do not, I repeat, DO NOT, try to
mark your authorities as you write. It will make your life more complicated. I
typically mark my cases for inclusion in the table of authorities when the text
of the brief is finished and I’m cleaning up all of my citations. I might make
some minor edits, add a paragraph here or there after I do this, but I’m not
adjusting the order of citations.
Once you brief is finished, start at the top of your brief and
find the first citation. Highlight the entire citation. Go to the References
tab on the ribbon and click on “Mark citation”.


On this screen, you will also need to ensure that you have
the correct category selected for this citation. Since this is a case, I have
selected Cases. Ignore the other areas of this window for now and choose the “Mark”
button.
After you click “Mark”, you will be taken back to your
document.

If you weren’t showing paragraphs marks (you didn’t have the pilcrow
selected on the Home tab) you may be surprised to see a completely different
looking document. It will look something like the below. Of note, the highlighted
information is the information added, but don’t worry, it won’t show up when
you print. Unless you know what you’re doing, DO NOT EDIT THE ADDED
INFORMATION. Editing it will affect how your table of authorities is built.
Repeat this process for every new citation you come across.
Of course, eventually, you will come across a short citation or an id.
citation. In that case, you will highlight the short citation and choose mark
citation as before.

This time, when the window pops up, simply click the case
name in the short citation list that the citation you are adding points to.

So,
in my example, I’ve highlight an Id. in my document, but it points to the
Marbury case, so I choose Marbury from the short citation list. If the short
citation is not a case but a statute, make sure you look in the correct
category. Once highlighted, choose Mark.
Once all of your citations are marked as set out above, go
to the point in your brief where you want to insert a table of authorities. Put
the cursor on that spot. Then, go to the References Tab on the ribbon and
choose “Insert Table of Authorities”.

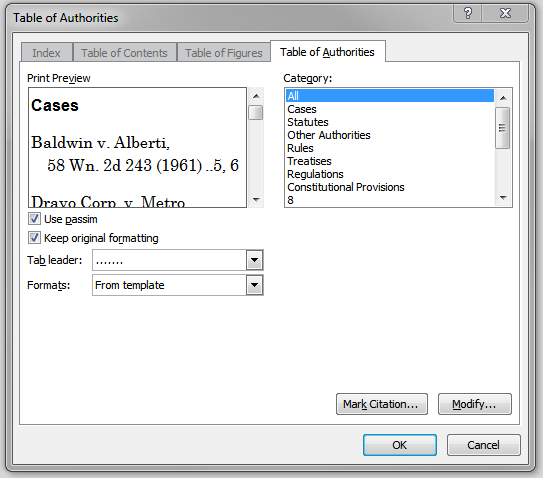
For now, we’re just going to insert the table.
So, make sure you have “All” selected under categories. If you only wanted to
insert some of the categories, you could do that here. Note, it will only insert
categories that actually have items in them. So, if you have no Rules, it won’t
display an empty Rules area. Next, choose “OK”.
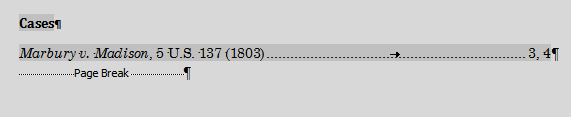
And, as you can see, you now have a wonderful looking Table
of Authorities.

Now, let’s say you have added other pages or moved some items
around. No problem. Prior to finalizing your brief for printing and saving,
turn off the option to show formatting (again, the pilcrow on the home page).
Next, right click on your table of authorities and choose “update field”.

It is important that you
not be showing formatting marks when you do this. I’ve found that the length of
the information added by mark items for the table can do weird things to the
page numbering IF you have it showing when updating fields. So, if your page
numbers seem off, that may be why.
That’s it. It really isn’t that hard. And the time and
headache it can save with manually checking the page numbers and updating it
when you make little edits more than make up for the time it takes to actually
follow this process.
Tuesday, January 20, 2015
Feeling a Lack of Ambition? Hang Out with Some Legal Tech Folks
With the ending of the holiday season and all of the spectacle and business that comes with it, I was feeling somewhat exhausted and burnt out. My ambition for taking on new projects and learning new stuff was low. Fortunately, that all changed last week.
Last week, I had the opportunity to attend and present at the Legal Services Corporation's Technology Innovation Grant annual conference in San Antonio. The conference brought together advocates and legal tech types from across the county to talk about how to better use legal technology to help not only legal attorneys but their clients and the thousands of people across the country who can't afford an attorney and that a legal aid program is unable to assist.
Hanging out with that crowd, picking their brain, and listening to their ideas was just what the doctor ordered. The amount of enthusiasm, creative thinking, and energy was infectious. Ordinarily, I find conferences and social events to be draining. While I was physically exhausted after 2 1/2 intensive days or tech, I left San Antonio with more mental energy than I've felt in several months.
So, if you're feeling a lack of ambition, find a group of legal techies and hang out with them. Ask them what new project or thing has them excited. I don't think it is possible to come away not feeling refreshed and ready to take on the world.
Monday, January 5, 2015
Tips From Legal Office Guru on Tables of Authority
Hope everyone had a merry Christmas and Happy New Years and all of that. I know I enjoyed a couple weeks away from the office and mostly disconnected. However, now it's time to get back, and I'm looking froward to a new year of blogging.
To get the new year started, I wanted to point out a great post over at Legal Office Guru that discusses common errors in creating tables of authority in Microsoft Word. I'll admit that I've learned the hard way why this article hits the nail on the head.
I hope to have a post up this week doing a walk-through on how to do it right.
Subscribe to:
Posts (Atom)