Showing posts with label Microsoft Word. Show all posts

Monday, August 29, 2016

If You're Not Using Quick Parts and Auto Texts, You're Wasting Time and Money

It's an old adage that, as attorneys, our stock in trade is our time and advice. Accordingly, wasting time on technology is not only wasting time, it is wasting money and resources. If you have technology in front of you that can save you time and you don't use it, then you are wasting your time. Quick parts in Microsoft Word is one of those technologies that not everyone is aware of that is sitting right in front of them. So let's learn a little bit about quick parts.

First, in Office 2016, it feels like they have made quick parts and auto text harder to find. If you go to the Insert tab on the ribbon, you'll find them under the text group. If you have too many items on the ribbon or less screen real estate you might only see the icon. I've circled what you're looking for in this picture:


As you can see, if only the icon is displaying, you have to already know about quick parts to find it. At least, that's how it seems to me. Here's a better picture of just the icon you need:


Now that you've located it, what do you do with it? If this is the first time you've even looked at that icon, there's not much to do.

Yet.

While Microsoft does some fantastic work and there's a reason that its suite of office products is basically the standard everywhere, it hasn't yet figured out how to read your mind. It doesn't even use the type of machine learning that can pay attention and figure out how it can save your time. Instead, we still have to tell Word what can save us time.

Let's start with something simple. Something we lawyers probably use on a regular basis: a pleadings signature block. Including formatting and margin settings and tab stops, here's what mine looks like:
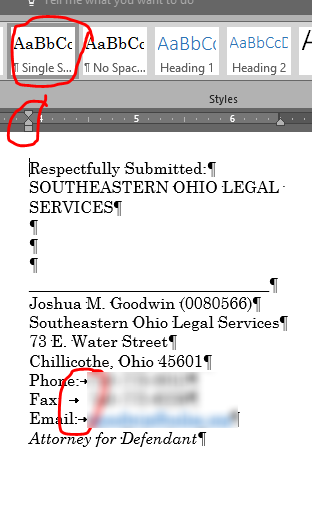

As you can see, there is some special stuff going on here that a simple auto correct is not going to be able to cover. It uses a specific single spaced style. The left margin is set to slightly less than 4 inches, and I use a custom tab stop to line up my phone, fax, and email. Doing all of this from scratch every time is tedious at best, likely to produce the occasional typo, and a waste of time. You could keep a master signature block somewhere I suppose and copy and paste from it, but even that's tedious to me.

This is where quick parts and auto text shine. On my system, I have this set as an auto text. This way, when I start typing "respectfully submitted", Word asks if I want to insert my signature block:


Isn't that helpful? Now, anytime I want to put in my signature block, I just start typing it and Word asks if it can do all the hard work for me. If only everything in life worked this way; I get out the cutting board and my kitchen asks "Can I go ahead and instantly make your favorite meal, a nice paneer curry with naan and jasmine rice? It will be exactly the way you like it, of course."

Of course, this culinary example illustrates a potential problem with using auto texts. What if I didn't want curry but was getting out the cutting board to chop up a carrot for my kids? I could ignore the prompt and just keep going. But what if I wanted to type respectfully and hit enter. If I do that, it will assume I want my signature block.

This is the potential problem with auto text: it can make assumptions you don't want it to make. So you either have to use specific names that are unlikely to have you pressing ENTER afterwards, or you need to use a different method. Fortunately, Word provides that different method with quick parts.

Quick parts functions similarly to auto text in that both insert blocks of formatted text. But the way you access them is different. Auto texts appear when you start typing the name you've given the auto text. Quick parts do not. Instead, with quick parts you start typing the name of the quick part and hit F3. OR, you click on the quick parts icon and choose the block of text you want.

With quick parts, your quick parts show up immediately in the quick parts icon. Auto texts do not show up like this, which can make them a touch slower to access if you don't remember what you named the auto text.

Now for the part you've probably been waiting on: How do I actually make the darn things? It's surprisingly easy.

First, type and format the text you want turned into a quick part.

Second highlight that text.

Third, click on the quick parts icon. In the menu that comes up, if you want to save the item as a quick part, choose the "Save Selection to Quick Part Gallery..." option. If you wish to save it as an auto text, choose Auto Text and then select the "Save Selection to Auto Text Gallery..." option.

It will then open a window that looks like this:


By default, it will suggest a name that is the first couple words of your selection. You can change this to whatever you want. The name you give it though is going to be what you type in your document to get it to automatically add the auto text or quick part text. You can then select whether you want to save it as a quick part or auto text. You can categorize your selections (perhaps signature lines, discovery, pleadings, etc.). Lastly (at least as far as this post is concerned) you can choose whether to save this in your normal.dotm file or another setting. I almost always choose normal,dotm so it is available regardless of what document I'm typing in.

Click on OK, and you now have your quick part or auto text ready to use.

I do not recommend going out and setting up a bunch of these in a rush just to get started. Instead, be conscious of what you're typing for a week. If you find yourself typing the same thing a couple of times in a row, then go ahead and add it. If you try to think of everything in advance, odds are you will forget what you named your quick part and will forget to use it.

So, get out there and start saving yourself some time and stop wasting resources on typing the same thing for the 100th time this month.

Sunday, August 28, 2016

Change Computers Without Losing Your Word Settings

In our office, we recently upgraded our computers to Windows 10 and jumped from Office 2010 to Office 2016 and Office 365. The new computers now have solid state drives (which are crazy fast) and I couldn't be happier.

One of the things I'm happiest about is that even though I got a new computer and the latest version of Microsoft Office, I didn't have to start over with a blank copy of Word. I was able to transfer all of my quick parts, auto corrects, ribbon settings, and macros from my old computer to my new computer. The best part, it wasn't too hard to do.

First, let's get all of our ribbon and quick access toolbar customizations from the old computer. In Word, go to File => Options => Customize Ribbon. In the box that pops up, you'll choose the drop-down in the lower right labeled Import/Export, which is circled below. Then, choose Export All Customizations.


Save this file on a flash drive or in some other location that you can access on your new computer. Then, on the new computer, open Word and go to File => Options => Customize Ribbon. Again choose the Import/Export drop-down circled in the picture above and this time choose Import Customizations. Select the file you saved in the previous step and you will now have the same ribbon and quick access toolbar setup as on the old computer.

Of course, you will also want to bring over your Normal.dotm file from the old computer. This is where you basic page setups reside, including your default styles and your macros. To do this, open your file explorer and navigate to the following path: C:\Users\[user name]\AppData\Roaming\Microsoft\Templates. Obviously, you'll replace [user name] with the user name for your computer.

One important note, if you navigate to your user name and don't see a folder labeled AppData, it simply means that you are not currently viewing hidden folders. The AppData folder is hidden by default to prevent accidentally changing it's contents. To view it, navigate to the Users\[user name] folder. Then, go to the View tab on the ribbon and check the Hidden Items box:


Once you get to the Templates folder, you'll need to copy the Normal,dotm file. Then, on the new computer, navigate to the same folder and replace the Normal.dotm file on the new computer with the one from the old computer.

Next, you will want to copy all of your quick parts and other building blocks from the old computer. This time, on the old computer you'll navigate to C:\Users\[user name]\AppData\Roaming\Microsoft\Document Building Blocks\1033\16. That last number could be 10 or another number depending on which version of Word you are using. In this folder, you'll need to copy the Building Blocks.dot and the Built-In Building Blocks.dot files to take them to the new computer. Again, on the new computer, navigate to the same folder and paste in the files you just copied.

Lastly, let's copy over your auto-corrects. On the old computer, navigate to the following folder:  C:\Users\[user name]\AppData\Roaming\Microsoft\Office. In that folder, look for all the files named MSOXXXX.acl. The X's will be numbers. Copy all of the files that match that description and transfer them to the same folder on the new computer.

By following these steps, your new version of Microsoft Word on your new computer will be just like your old version, which will let you get up and running fast.

Friday, June 12, 2015

Quick Parts in Word - USE THEM!

For those Microsoft Office 2003 power users out there, you might know everything there is about Word 2003, but the Ribbon in 2007 and later frustrated you. If, like me, you resisted the change to 2007 or later, you might not have taken the time to learn all the advances in 2007 and later versions. Instead, you relied on macros and auto-correct to do most of your work.

If that's the case, you might be entirely unaware of Quick Parts. Quick Parts allow you to enter large blocks of text with formatting in a matter of a few clicks. Even better, it is incredibly easy to create Quick Parts; they are much easier than macros and auto-correct.

If you haven't done so, I highly recommend that you make them a regular part of your practice. Create Quick Parts for your signature block, court captions, your standard deposition notice language, your standard notice of appearance language, all of those stock objections you raise on every response to a request for production. And the list just goes on.

To learn more about them, I recommend checking out this article from the ABA.

Wednesday, January 28, 2015

The Beginner's Illustrated Guide to Tables of Authorities in Word

Okay, by now we all are aware that Microsoft Word can help manage the table of authorities in your brief. Yet, how many lawyers actually use this function let alone understand how it works? How many legal assistants understand it? How many times have you tried to use this function only to give up and go back to doing it by hand and hoping it all worked out well?

I understand. I don't think it is a well-documented feature. Yet, once you know how to use it, you will not go back to doing it by hand. 

So, let’s dig into an image intensive look at how to actually let Word create the table of authorities for you. This will be a lengthy post, but I think seeing screen shots of what to do will make it easier to figure out what to do.

First, write your brief. Do not, I repeat, DO NOT, try to mark your authorities as you write. It will make your life more complicated. I typically mark my cases for inclusion in the table of authorities when the text of the brief is finished and I’m cleaning up all of my citations. I might make some minor edits, add a paragraph here or there after I do this, but I’m not adjusting the order of citations.

Once you brief is finished, start at the top of your brief and find the first citation. Highlight the entire citation. Go to the References tab on the ribbon and click on “Mark citation”.


 This will bring up a new window. The first citation in your brief will of course be a full or long citation, and it might even have a pinpoint to the page number in the reporter. In the “Selected Text” box will be the citation you had highlighted. Edit the text in this box to be what you want to show up on the table of authorities. For example, I would remove the pinpoint citation in this example.


On this screen, you will also need to ensure that you have the correct category selected for this citation. Since this is a case, I have selected Cases. Ignore the other areas of this window for now and choose the “Mark” button.

After you click “Mark”, you will be taken back to your document. 


If you weren’t showing paragraphs marks (you didn’t have the pilcrow selected on the Home tab) you may be surprised to see a completely different looking document. It will look something like the below. Of note, the highlighted information is the information added, but don’t worry, it won’t show up when you print. Unless you know what you’re doing, DO NOT EDIT THE ADDED INFORMATION. Editing it will affect how your table of authorities is built.

Repeat this process for every new citation you come across. Of course, eventually, you will come across a short citation or an id. citation. In that case, you will highlight the short citation and choose mark citation as before.


This time, when the window pops up, simply click the case name in the short citation list that the citation you are adding points to.


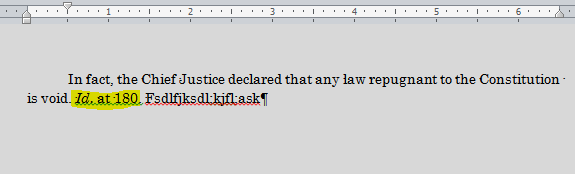
 So, in my example, I’ve highlight an Id. in my document, but it points to the Marbury case, so I choose Marbury from the short citation list. If the short citation is not a case but a statute, make sure you look in the correct category. Once highlighted, choose Mark.

Once all of your citations are marked as set out above, go to the point in your brief where you want to insert a table of authorities. Put the cursor on that spot. Then, go to the References Tab on the ribbon and choose “Insert Table of Authorities”.


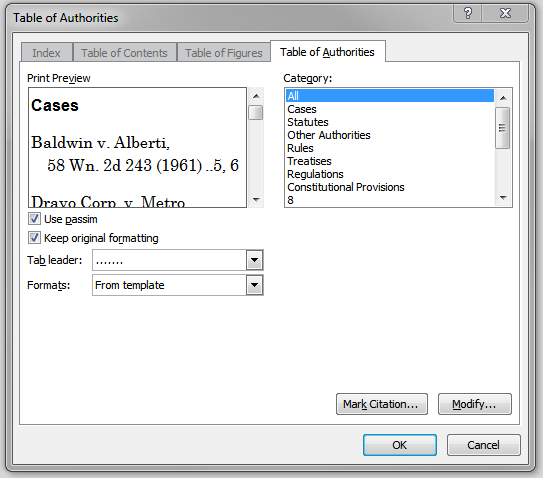
 This will pull up a new window. You can modify how your table will look in this window. 


For now, we’re just going to insert the table. So, make sure you have “All” selected under categories. If you only wanted to insert some of the categories, you could do that here. Note, it will only insert categories that actually have items in them. So, if you have no Rules, it won’t display an empty Rules area. Next, choose “OK”.

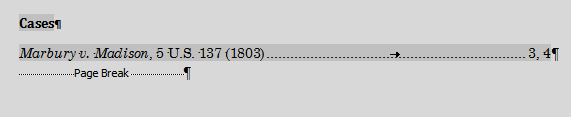
And, as you can see, you now have a wonderful looking Table of Authorities. 


Now, let’s say you have added other pages or moved some items around. No problem. Prior to finalizing your brief for printing and saving, turn off the option to show formatting (again, the pilcrow on the home page). Next, right click on your table of authorities and choose “update field”.


 In my example, I added a whole new page. As you can see, this automatically updates all of the page numbers.


It is important that you not be showing formatting marks when you do this. I’ve found that the length of the information added by mark items for the table can do weird things to the page numbering IF you have it showing when updating fields. So, if your page numbers seem off, that may be why.


That’s it. It really isn’t that hard. And the time and headache it can save with manually checking the page numbers and updating it when you make little edits more than make up for the time it takes to actually follow this process.

Monday, January 5, 2015

Tips From Legal Office Guru on Tables of Authority

Hope everyone had a merry Christmas and Happy New Years and all of that. I know I enjoyed a couple weeks away from the office and mostly disconnected. However, now it's time to get back, and I'm looking froward to a new year of blogging.

To get the new year started, I wanted to point out a great post over at Legal Office Guru that discusses common errors in creating tables of authority in Microsoft Word. I'll admit that I've learned the hard way why this article hits the nail on the head.

I hope to have a post up this week doing a walk-through on how to do it right.

Monday, December 1, 2014

Use Tab Stops to Line Up Words in Microsoft Word

I've talked in the past about the importance of using the left indent instead of the space bar when adjusting where to start text on the page. This addresses how to align the left margin of blocks of text. But, what about aligning items in the middle of a sentence?

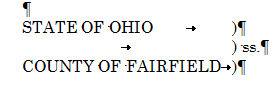
For example, let's look at the top of an affidavit in common use in Ohio:

The goal here is to align the closing parentheses vertically. I've received a number of documents from colleagues where they are almost aligned, but not quite:


The reason for the misalignment is simple. The drafter used the space bar to try to line everything up:


There are a number of problems with this method. First, it will rarely result in having everything lined up vertically unless you are using a monospaced font.  As Butterick says in Typography for Lawyers, "There are no good reasons to use monospaced fonts. So don't."

Second, fixing typos can be a pain. If you notice you made a mistake with the space bar method, you will likely have to go back and fix all of those spaces again, which can be a headache.

Lastly, it is time consuming. You end up spending a good deal of time trying to get the alignment close only to end up with imperfect results.

Instead of using the space bar, set tab stops. Here's how I would create the alignment. 

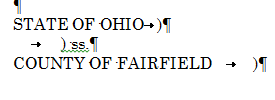
First, type in your text and insert a single tab between the last word and the closing parentheses. So, when you're done, you'll have something that looks like this:


Those arrows pointing to the right indicate the press of the tab key. So, how does this help us? Now, when you adjust the tab stop, it will align those parentheses. To do this, highlight all three lines. Then, click on the top ruler to insert a tab stop where you want the parentheses to line up:

This will add a tab stop on your ruler, which I have circled above. Now, your parentheses will all be perfectly aligned. 


If you need to edit the location of the parentheses at any point, simply highlight all three lines and click and drag the tab stop in the ruler to the new location. 

Using this method will save you time and headache and result in a better end product than using the space bar.

Friday, October 3, 2014

When Should I Create a Macro for a Given Word Task?

A colleague asked me recently when she should create a macro in MS Word for a particular task versus just plowing ahead and doing it the long way. My off the cuff response was, "create a macro if it is going to save you time in the long run", which is less than helpful. How could she know if it would save her time in advance? How much time would it have to save to be worth it.

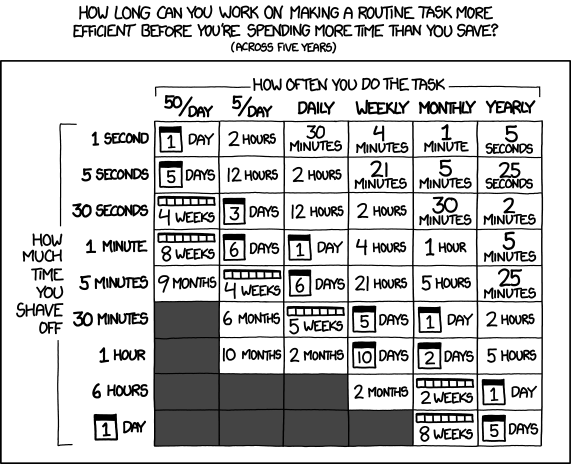
So, here is the long answer. Check the following XKCD chart, which I keep bookmarked:


http://xkcd.com/1205/

What does this mean? Well, if the task in question is something you do once a day and a macro would save you 5 seconds and you expect that you'll be doing the task daily for the next five years, then you should create the macro if you can do it in less than 2 hours. In other words, even if it takes you an hour to create a macro that only saves 5 second of your time, if it is a task you do daily, then it would be a good time investment. If you only want to amortize the time out over a year, divide by 5, which means you could devote 24 minutes to it and come out ahead.

How long does it take to create a macro. It depends. If you're going to use a macro that just types out a long paragraph or two, then not long at all. The next time you go to type it, simply record it as a macro and you're done. Quickly assign it a shortcut key and you're saving your 5 seconds. And, this should only take an extra minute longer than doing the task by hand, which means you're going to be well within the 2 hour or 24 minute time limit.

If you're going to have to get into the details of VBA and coding a macro, it could be a lot longer, especially if you're not familiar with VBA. I've had a number of times where I go to make something simpler by coding a macro from scratch and I end up burning way more time than it saves because I had to do so much research on how to write the code.

The long and short of it is: if creating the macro is simply a matter of recording what you do, then you should almost always err on the side of recording it. In the long run, you'll probably save time. If it is going to require anything more than that, I'd talk to someone before trying to do it on your own.

Thursday, September 18, 2014

Create a Word Template that Let's You Choose One of Multiple Letterheads

Reader Autumn recently asked a question on an older post regarding office-wide letterheads:

What if you have multiple offices and want to do a drop down picklist of what office they would like to choose? Is that an easy process? For example we have 13 offices and want to only change one of our letterheads if someone gets fired/hired.

Can it be done. Yes.

Is it an easy process? It took me about half an hour to develop and test a solution from scratch. It is going to be a little more in depth than other projects on this blog, and, to be honest, if you're not familiar with the VBA editor for Microsoft Word, it might seem a bit daunting. But let's try to walk through one potential solution.

To start with, create all of your letterheads in separate .dotm files. The file name should be the location of the office. So, for example, if I had offices in Columbus, Cleveland, and Chillicothe, I should have three separate letterhead files called Columbus.dotm, Cleveland.dotm, and Chillicothe.dotm.

Next, save them all in the same folder and location. This step is very important.

Then, we're going to create a new document called letterhead.dotm. It should be a blank document, nothing on it. Here is where it is going to start getting a bit tricky because you're going to have to do some work in the VBA code editor. To open it, hit Alt + f11.

When it opens, in left pane near the top will be a list of files. One of them should be called "letterhead.dotm". Right click on it, choose insert, and then choose UserForm.


To the UserForm (which should be called UserForm1), you will add three items. The first is a label, which you'll change to read "Which Letterhead?" The second is a ComboBox. The third is a button that you'll change to read "Ok". When you're done it should look like this (I've identified in the toolbox with arrows which tool let's you add each item).


Next, you need to right click in the middle of your form (though not on any of the things you added) and choose "View Code". Make sure that the left dropdown box in the new window says UserForm and change the right box to Initialize.


Underneath where it says Private Sub UserForm_Initialize() you are going to add the following code:

With ComboBox1
    .AddItem "Columbus"
    .AddItem "Cleveland"
    .AddItem "Chillicothe"
End With

It is important that each of the city names be spelled exactly as you named the files earlier on. If you're like Autumn and have 13 offices, you would just keep repeating the .AddItem "cityname" until you had them all listed. Note, if you changed the name of your combobox from earlier on from combobox1 to something else, you will need to change it in the code above.

Next, you need to tell the computer what to do when someone hits the OK button. So, in the top left dropdown you will change it to the name of your button (probably CommandButton1) and you will change the right drop down to Click.


In the new area under Private Sub CommandButton1_Click() you're going to add the following code:

Dim selection As String
Dim FileName As String

selection = ComboBox1.Value

UserForm1.Hide


FileName = "path of your files" & selection & ".dotm"

ActiveDocument.Close False

Documents.Open FileName

You will need to change the red letters above to be the path of your letterhead files. For example, if you saved them on the c: drive in a folder called letterheads, you would change the red lettering to

c:/letterheads/

It is important that you not forget that final slash.

So what does this do? It tells the computer to take the name of the city chosen and save it as a variable called selection. Then, it hides the popup userform. Next it create a variable called FileName that will be the path and name of the file you want opened. It closes the current document and opens your letterhead template.

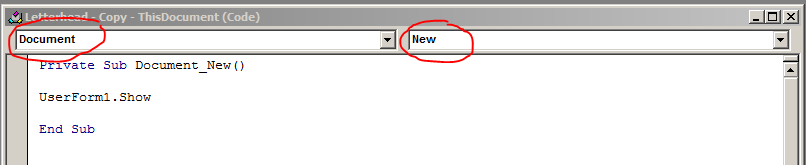
The final step is to tell the template that when it starts up that it should show your combobox. To do this, right click on the file named "ThisDocument" under your Template Project called Letterhead and choose view code:


When the code window pops up, change the left drop down to Document and the right to New.


In the space under Private Sub Document_New(), add the following line:

UserForm1.Show

Now, save everything, and you are finished. When you double click on your letterhead.dotm template, it will now open the blank document and show your pop up window letting you select your office. When you choose your office and hit OK it closes the current document and opens the appropriate letterhead. Best of all, if you place all of these files on a shared server, anyone in the office or company can use them.

Hope this answers your questions, Autumn.

Thursday, September 4, 2014

Easily Create Linked Citations in Your Emails and Research Memos

When you are trading emails with co-counsel and discussing the law, the citations to statutes and cases can start piling up. And when you deal with research memoranda, the number of these citations simply balloons. Of course, to check any of these, you have to copy the citation into Google or look it up. It would be nice if they could all be hyperlinks that took you exactly where you wanted to go.

Microsoft makes this relatively easy. And, it allows you to do it without having to include the entire URL in the body of the text, which means everything is still human readable.

So, let's use a simple example. Suppose I was to send a colleague an email with the line "The definition of who is a tenant can be found in Ohio Rev. Code s. 1923.02, which defines it as follows:". It would be nice if I could make the words "Ohio Rev. Code s. 1923.01" be a link that he can click and take him directly to http://codes.ohio.gov/orc/1923.02, which is where this statute can be found.

To do this, go ahead and type your whole sentence into your email or into your Word document. Next, highlight the text you want to turn into a link. Next, hit Ctrl + k, which will bring up the following window:


All you have to do is put the URL in the Address: box, which I've circled. You can either type it in directly, or, you can copy it from your web browser and just paste it in. Then, hit OK, and you now have a link right in your email or Word document. This makes it easier to use the email or document in the future when you want to check out the citation.

Wednesday, August 13, 2014

EASILY INSERT SCREENSHOTS INTO YOUR WORD DOCUMENT

Previously, I explained how the Snipping Tool made it easy to grab screenshots and save them. Today, I want to show how Word 2010 has a similar feature built right in. And if you're using two monitors (you're using two monitors right?), then it is incredibly useful.

To locate the feature in Word (or most of the MS Office suite products), go to the Insert tab on the ribbon and click on Screenshot.


If you have two monitors, the entire second monitor will be one option you can instantly insert. The other options will likely be other windows you have open behind your instance of Word. Clicking on one of the thumbnails will instantly insert the entire window or monitor into your document.

If instead you click on the Screen Clipping, then your entire screen will go light gray (just like the clipping tool). Then, you can select what you want to capture and draw a box around it. The selected area will be inserted into your document automatically.

If you're using just one monitor, then you need to make sure that the information you want to capture is the last window you had opened prior to opening Word for this to work.

I use this method when I am working in Word and sending email in Outlook. I use the clipping tool when I want to save images of my desktop as image files. Both methods work to accomplish the same thing, but each is convenient under different circumstances.

Tuesday, May 27, 2014

HELP YOUR EYES - CHANGE WORD'S BACKGROUND COLOR

By default, the background color for typing in Word is bright white. For some people, myself included, this bright white can cause eye fatigue after a while. So, I've found that changing from the white to a gray background can help.

To change your background color, open up your normal.dotm file to edit it. Go to the Page Layout tab in the ribbon and click on the Page Color button. There, you can choose a color more to your liking. Be sure to save your normal file.


Now that your eyes have thanked you, there is another consideration. If you print this out, it might print out the colored background. There are times you may find this desirable, but most of the time, you won't.

To fix this, go to the File tab, then choose option. Click on the Display button on the left side menu. Ensure that "Print background color and images" is unchecked.


Now, when you print, it will ignore the gray background. Of course, if you want to actually print a background in the future, you will need to check this box.

Lastly, when you re-open Word, it might not display your new, colored background. To fix this, you will probably need to display background content. Go to the File tab, choose options, and then choose Advanced from the options on the left. Scroll down and check the box for "Show background colors and images in Print Layout view".


Tuesday, May 6, 2014

MAKE A MACRO TO INSERT YOUR ELECTRONIC SIGNATURE

Recently, we explained how to insert your electronic signature into a Word document. It isn't a terribly complicated process, yet, going up to the insert button and then searching through your file system to find your signature can be annoying. Or, if you've forgotten where you saved the file, impossible. Wouldn't it be nice if there was a way to automate that step?

Fortunately, Word's macro feature provides the perfect solution. Moreover, it is an exceptionally easy macro to write. The entirety of the code is:

    Selection.InlineShapes.AddPicture FileName:= _
        "your signature file", LinkToFile:=False, _
        SaveWithDocument:=True

Create a new macro and insert this code. All you have to do is replace the red words with the location of your signature file. As an example, if your signature was called signature.png and was stored in your MyDocuments folder on the C:/ drive, you'd replace the red letters with c:/MyDocuments/signature.png. Note, you have to put that between the quotation marks.

From there, you can create a shortcut key or put it in your quick access bar for easy inserting.

Wednesday, April 30, 2014

INSERT YOUR ELECTRONIC SIGNATURE IN MICROSOFT WORD

Previously, we discussed how to create an electronic signature. Today, let's see how you can add it to your Word document. We're assuming that you have saved a copy of your electronic signature in a file somewhere and can access it. This could be on your desktop, your My Documents folder, or even on a server somewhere else.

To start with, create everything in Word just as you would do if you were to print out the document and physically sign it. So, for example, you might have the following:


Next, move your cursor to the spot where you want your signature to appear. Click on the Insert Tab on the Ribbon and choose picture:


In the window that pops up, navigate to your signature file and double click on it. This will insert your signature in the document, though it will likely mess up your formatting:


As you can see, it expanded the signature area. Moreover, it doesn't really look like how you would sign something if you had printed it out since the letters aren't on the signature line itself.

To fix this, left click on the signature. Then go to the Ribbon, choose Format. From there, click on the Wrap Text menu and select "In Front of Text":


What this does is put the signature on top of everything already in your document without actually reformatting the text itself. The end result is a file with your signature in it electronically that looks like you had actually signed the document. If the signature isn't placed exactly where you want, you can click and drag it to sit perfectly on the line:


Monday, April 7, 2014

THE NAVIGATION PANE - ANOTHER REASON TO USE STYLES IN WORD

I've mentioned a number of times the importance of using Styles in Microsoft Word. It helps ensure your formatting is the same across your document, it makes it easier to change your formatting, and it automatically builds a table of contents for you. If that isn't enough to convince you to use Styles, let me add another reason: it makes document navigation easier.

If you have a document that is several pages long with multiple sections - briefs come to mind - it can be daunting at times to find the section you want to review. However, it you format each heading using a Style, then the navigation pane will allow you to easily jump from to the section you want to review.

To open the navigation tab, you can either go to the Home tab and click on the "Find" button or just press Ctrl+f.


This will open a pane on the left hand side that allows you to search your document for a keyword. If you click on the navigation pane button, it will pull up a table of contents. I've circled the correct button below.


Clicking on any of the labels in the pane will take you directly to that section of your document.

As if that wasn't useful enough, you can actually reorganize entire sections in this pane. Let's suppose you really meant to have the State of the Case after the Statement of Facts. Simply click and drag the Statement of the Case label below Statement of Facts. Doing so will move the entire section in your document. That includes both the heading as well as all of the body text in that section. This method of moving sections is much more efficient and less frustrating than trying to do it in the body of the document itself.

None of these features work unless you have assigned each heading a table of content level, which is most easily done through the use of Styles. Yet another reason to start using Styles.

Monday, March 31, 2014

MICROSOFT OFFICE ON ANDROID - AND IT'S FREE

I'm getting ready to leave for a training out of state this afternoon, but wanted to mention this. Microsoft office, or at least a basic version of it, is now available in the Google Play store. The best part: it's free. I haven't yet played around with it enough to decide whether I like it better than the other productivity apps out there, but I would be lying if I didn't say I was excited.

You can get it here.

Friday, March 21, 2014

PLEASE, PLEASE, PLEASE, DON'T USE THE SPACE BAR FOR INDENTING TEXT

In one of my earlier posts, I explained why you shouldn't use the tab key to indent text but should simply adjust the left margin. I should have added that you shouldn't use the space bar either.

Recently, I received a proposed policy for review that looks like the below image when you print it:


Obviously, I change the characters to make it impossible to read for this. Wen I opened it to make some edits, this is what I found:


Every one of those dots is a press of the space bar. Formatting your document this way will make editing it later, even just changing one word, maddening. Especially if you're not editing it with special characters revealed.

I'm begging you, please learn how to set the margins instead of using the tab key or the space bar. It isn't just for my sake, it's for your own as well. Your typing life will be made so much easier if you do.

Wednesday, March 12, 2014

SHARE WORD MACROS WITH OTHERS ON YOUR NETWORK

In our office, we have a central server where all of our files are stored that everyone has access to. Since everyone can access this location, we decided it would be nice if everyone could share the same useful macros.

To do this, we created a blank macro-enabled word template. In it, we either created or added all of the macros we thought would be useful.Then, we saved the document on the server.

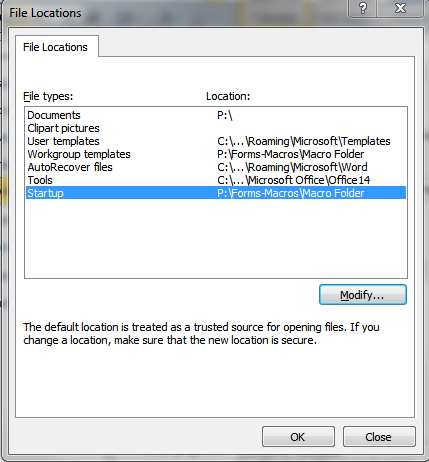
To enable everyone to have access to these macros, each user opened up Word, clicked on the file tab, then chose options. They chose Advanced from the tab list on the left and scrolled all the way to the bottom of the window. There, they clicked on the "file locations" button, which opens a new window.


From here, highlight the Startup line and click on the modify button. Then, navigate to and highlight the folder in which you saved the template and click open. Note - you will not see your file, you are actually identifying the folder. Keep hitting OK and restart Word. When it restarts, you will now have access to all of the macros in the template.

Monday, March 3, 2014

USE A MACRO TO ADD YOUR LETTERHEAD TO A DOCUMENT

Previously, we explained how to create an officewide letterhead template so that everyone in your office would always use the same letterhead and updating it could be done one time and everyone would get the update. Today, let's take that idea one step farther and create a macro that will put the letterhead on your open document.

The comments in the macro explain exactly how and why the macro works. For those not interested in why the macro works, running the macro on an open document will create a new file with the text of your open document but the header and footer of your letterhead template.

The blue, courier text below is the entirety of the macro. The only customization required is inserting the path and file name of your letterhead template in the red text below. For example, if your letterhead template was called letterhead.dotm and was stored in a folder on your c:\ drive called templates, then you would replace the red text with c:\templates\letterhead.dotm.

Sub LetterHead()
'
' Letterhead Macro
' add letterhead to existing document
' Joshua Goodwin 2012
'

'copy current document
Selection.WholeStory
Selection.Copy

'close current document without saving
ActiveDocument.Close (wdDoNotSaveChanges)


' define path and filename for letter head template

Dim LetterHead As String

LetterHead = "replace red text with path and filename for your letterhead template"

' open letterhead template
Documents.Add Template:= _
        LetterHead, _
        NewTemplate:=False, DocumentType:=0

'paste into letterhead
    Selection.Delete Unit:=wdCharacter, Count:=1
    Selection.PasteAndFormat (wdFormatOriginalFormatting)

End Sub

Thursday, February 20, 2014

A MACRO TO PRINT ENVELOPES WITH POSTNET BARCODES

A while back, a colleague of mine asked how they could print envelopes with the POSTNET barcode on them. It turns out that Microsoft Word doesn't make this a simple process. So, I decided to write a macro to do this for them. I thought I would share it.

I've pasted the macro VBA code in blue below for you to copy into your own macro module. To use the macro, highlight the recipient's address in your document and run the macro. It will then ask you to type in the zip code. It will then print both your letter and an envelope with the POSTNET barcode on it.

As a note, please remember that I am an attorney and am entirely self-trained when it comes to programming. So if you see the code and cringe, I'd welcome any feedback on how it could be improved.

Sub BarCode()

'
' Joshua Goodwin
' 4/16/2012
' Adds an envelope and POSTNET barcode to document


'  Define and fill Variables

    Dim strAddress
    Dim strZipCode As String

    strAddress = Selection.Text
                  
    strZipCode = InputBox("What is the Zip Code?")

' print letter

 Application.PrintOut FileName:="", Range:=wdPrintAllDocument, Item:= _
        wdPrintDocumentWithMarkup, Copies:=1, Pages:="", PageType:= _
        wdPrintAllPages, Collate:=True, Background:=True, PrintToFile:=False, _
        PrintZoomColumn:=0, PrintZoomRow:=0, PrintZoomPaperWidth:=0, _
        PrintZoomPaperHeight:=0
    
 ' Create envelope and add to document
    
    ActiveDocument.Envelope.Insert Address:=strAddress & "**"
        
 ' Find location to insert barcode
    Selection.MoveUntil cset:="**"
    
    Selection.MoveRight Unit:=wdCharacter, Count:=2
    Selection.TypeBackspace
    Selection.TypeBackspace
    
 ' insert barcode

    Selection.Fields.Add Range:=Selection.Range, Type:=wdFieldEmpty, Text:= _
        "BARCODE  \u" & strZipCode, PreserveFormatting:=True
    
 ' Print envelope
    
    ActiveDocument.Envelope.PrintOut
  
 ' Delete envelope from document
  
    ActiveDocument.Undo (4)


End Sub

Wednesday, January 22, 2014

TYPOGRAPHY FOR LAWYERS - A MUST READ FOR EVERY LAWYER

There have been a number of posts on here about how to tweak Word to help you in your day-to-day practice. But little attention has been paid to how everything you create in Word should look. In fact, that is a topic I didn't take seriously until a couple of years ago when I stumbled across Typography for Lawyers

The Typography for Lawyers site and book goes in depth in the importance of the type of font you should use, when to use it, and a vast array of formatting issues. I frequently refer to it and I send my colleagues to it whenever I have a question about how something should look in a brief.

Learning every Word trick and tip out there will do you know good if you don't follow good typographical principles.